Followers

27 July 2009

A recent trip up to North Queensland to see this little Cherub resulted in some beautiful photos being taken so naturally, Nana's been scrapping! I've finally gotten around to uploading some of my latest pages. This is a kit that I got from Kimmie at Paperartsy. I've added a few more flowers but loved the layout and words so it's pretty much what Kim designed.


I went to Amanda's of Mogo and spent ages browsing in her shop (and a small fortune!) , she has the most wonderful things and a lot of stock that is different to what I can get here in Canberra. Anyway the leaves here are done in a gold verdigris leaf then clear embossed. I think I'll try Crystal Effects next time to see if that doesn't mute the foil leaf. Yes, I still have to add the journalling!
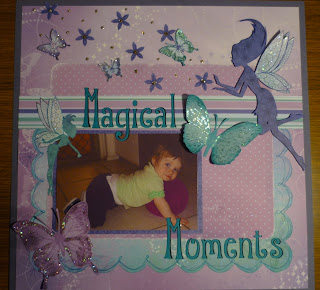
I picked up a scrapbooking magazine and there was this layout using the Airy Fairy papers from Kaiser Craft. I just love butterflies and fairies so had to 'case' it. I did add more butterflies and changed it slightly but essentially it's the same. Yes I still have to add the journalling, I struggle with that so usually leave it for weeks after I've completed the page.


After finishing the kit that I got from Kim, I had some more of the Garden Arabesque papers so created this layout. Hope you like it, I love how the dragonflies turned out.

Danielle herself picked out the flowers when I took her to the scrapbooking shop while I was in Nth Qld, so naturally I had to use them on a page for her. Cheeky minx loves to pick her Nan's flowers and eat them, she knows she's not allowed to, which is why she has her cheeky grin showing in the main photo. I spent a lot of time fishing petals out of her mouth!


Hope you enjoy.

25 June 2009

Becca n Blake


I've been playing around with editing and printing my digital photos and this pic of my daughter and grandson looked stunning in black and white, so adding just a touch of colour with the burgundy matting and ribbon seems to bring a slight pink tinge to the photo. I'm very happy with the results on this page. although my own photography skills need improvement as this photo of the page is just a bit blurred. I'm struggling a bit with the whole journal thing for scrapbooking and hope to improve on that one. I haven't added any here yet, I'll get around to it one day!

Splash!


Hi again, I've been busy creating scrapbook pages of my beautiful granddaughter Danielle. This photo of her in the bath was taken when she was about 4 mths old. Such big blue eyes it called out for lots of blue. I 'CASED' the splash layout from a scrapbooking magazine with a few changes.

The chipboard letters were inked in white craft ink then when dry were inked again in green. I then used the hot pink marker to edge each letter to tie it in with the colours in the ribbon. The background is simply an ink pad pressed lightly directly onto the card stock keep going turning the pad around until you get the textured look you're after. I've sponged the blue ink on the edges of some of the green flowers and added a bright blue rhinestone brad for a bit of bling!

08 June 2009

Cheeky Girl


These photos were taken of Danielle on Christmas Day, when she was 4 months old.....She looked like a little Christmas fairy in her dress, which I have from a very reliable source tasted just delicious!

I'm very happy with the end result of this page. I've used the I Wish simply scrappin' kit and Real Red, Whisper White and Chocolate Chip. Stamped the Scribble This flower twice in Real Red ink and added a little bit of Kindy Glitz. The Chipboard letters are covered in Red Riding Hood Designer Series Paper and the edges of the letters were brushed with Chocolate Chip Marker.

06 June 2009

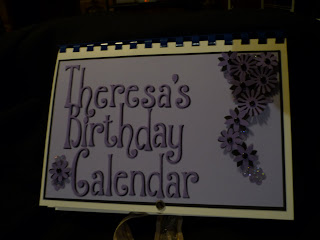
Theresa's Calendar

I've been making my birthday calendars for about 18 months now, progressively working my way through my friends and giving them as birthday or just because gifts. I'll post others at some time. I hope they provide some inspiration for you.

Cover:- This is using the Hippy Chick alphabet in my cuttlebug, I've cut the letters out twice, once in black then in Lavender Lace and layerd them to create a shadow effect, I've then punched out a heap of flowers in black and lavender and layerd them popped in a few black brads and then put a few little flowers around with Dazzling Diamonds for a tiny bit of bling!
January:- This is a CASED idea from a swap I got at the Stampin' Up! convention. Stunning colour combination using the Fifth Avenue stamp set and Kiwi Kiss and Elegant Eggplant card stock and inks.


February:- Embossed dragonflies from the retired Winged Things stamp set flying across this beautiful background paper. I've added a layered bow in vanilla ribbon. I've done this page on a few of my calendars as I just love the look.


March:- Upsy Daisy flowers are double stamped, first in Whisper White then in Night of Navy (wait till the white dries fully) I've used the Stamp a ma Jig to slightly offset the images to create the shadow effect. Sponged Night of Navy on the top of the Baja Blue card stock and added a Navy ribbon and silver buckle.


April:- I know Theresa just Loves purples, so this is Pale Plum and Perfect Plum with just a touch of White and Sage Shadow. I've used the retired hostess set Time Well Spent and layered the flowers, added a bit of Dazzling Diamonds glitter mixed with a bit of pink and blue fine supernova to create this lovely plum coloured glitter.


May:- These retired Stampin' Up! sets were borrowed and I just loved the words. I've combined Tangerine Tango designer papers, added a little bit of orange fine supernova glitter and water coloured the ladies.


June:- These cute frogs were borrowed from a friend to make this page. I've used the grasses stamp from the Inspired by Nature set and used the stamp a ma jig to multi stamp across the width of the background, stamped twice overlaying Mellow Moss with Always Artichoke then used the 2 way glue pen and the green fine supernova glitter to highlight a few stems of grass.


July:- This is the new Pink Pirouette card stock which is such a lovely soft pink, I've embossed all over the background with clear the filigree stamp from the Friends 24-7 stamp set, then used naturals card stock with the Friends jumbo wheel in Close to Cocoa ink, I've then spritzed the image with Close to Cocoa, Chocolate Chip and Pretty in Pink. Added a pink flower edged in dazzling diamonds glitter and a rhinestone brad. The words are stamped in Close to Cocoa on Pink Pirouette and three rhinestone brads for a bit more bling. I've then finished off with a layered bow in Close to Cocoa ribbon.


August:- This butterfly was borrowed from a friend, I've inked it up in three colours and then used clear embossing powder. The words are again borrowed, stamped and clear embossed to give a raised and shiny look. I'm really pleased with the way this one turned out.


September:- This angel collage stamp was inked in several pastel colours to give this effect. I've added some metal leaves and embossed the words. Very simple and elegant.


October:- I created the background paper using a Paisley jumbo wheel rolling it diagonally across 12 x 12 card stock. Here I've used Ballet Blue ink on same colour card stock. I picked up this cosmic lady at the craft show last year and this is the first time I've used her in a project. I've added some dazzling diamonds glitter mixed with a small amount of blue fine supernova glitter and dabbed a 2 way glue pen around the border of the butterfly stamp, and then just around the edges of the butterfly. Finished off with a strip of silver ribbon.


November:- This is the roses background stamped on versamark on black card stock and swirled Pearl-ex powders over the versamark. I've then cut sections of this and layered them onto Orchid Opulence. The butterflies are stickers on cardstock weight vellum and painted with twinkling H2o's to give the lovely perarlescent shine of the colours. The flash has lightened the effect somewhat, it has a much richer colour in the background than appears in the photo.


December:- This 'brick wall' effect just comes out beautifully I've used the retired Wintergreen papers and Handsome Hunter card stock. I've embossed the Snow Swirled christmas tree with silver and added highlights of red kindy glitz,

25 May 2009

Creative Frenzy!

Friends 24 - 7 and the Friends jumbo wheel make this beautiful soft card. I've stamped the card base in versamark and clear embossed the background on Pink Pirouette then added a mat of Close to Cocoa, a quick run of the Friends wheel across Natural cardstock and spritzed Pretty in Pink and Close to Cocoa inks to add some texture. Ive used the Eyelet border punch and then some close to cocoa ribbon. Stamped the salutation and added a few pink rhinestone brads.


Party Hearty stamp set is great for male cards, I've used Bashful Blue, Elegant Eggplant and Whisper White here, I inked the party hats individually and stamped them randomly in Bashful Blue on the card base, the tore a strip of Elegant Eggplant and adhered this to the Whisper White, added the glitter strip, which is the Blue Fine Supernova glitter mixed with Dazzling Diamonds for a softer paler blue, stuck straight down on a line of Sticky Strip! Stamped the Celebrate You and punched this out with the scallop punch. one very quick and easy card.


These playing cards make for a great masculine card. I stamped them on whisper white, cut them out and then fanned them into a 'hand' and used a black mat on Red Ridinghood card base. The greeting was stamped and then swiped the edges with Red Ridinghood ink. Add a ribbon and a couple of brads and it's another one finished.


Embrace Life card is 'CASED' from a swap I got at convention, it's just a stunning combination of the new In Colour Kiwi Kiss, Elegant Eggplant and Whisper White. Crimped the stamped image and punch out a border, add a ribbon then a sentiment and you're done.

There are more to come but this should keep you inspired.

Cheers for now,

Kasey


23 May 2009

Journal


Well, I've finally finished the house move and got down to some serious crafting. Inspiration from the Stampin' Up! convention had to be put on hold for a week or two while I packed and moved.

This journal is my first attempt at covering a book. I've put the page numbers for where you'll find the items in the Ideas Book and Catalgoue.


I've used the Stampin' Up! journal (pg 147) and Bella Bleu (pg 134) papers along with Pale Plum and Perfect Plum in to stamp 'Create' with the Lovely Letters Alphabet (pg 122) which I embossed with a blend of clear embossing powder and Dazzling Diamonds then punched out with the curly label punch (pg 153). I've sponged Perfect Plum ink around the edges of each label to provide some definition.
I've then used the new Sweet Sticky Cuts (pg 145) heart and this is covered with the new Fine supernova glitter (pg 145), I've mixed Pink, Blue and Dazzling Diamonds to come up with this lovely plum colour glitter. Oh I love this glitter!

I kept the middle insert heart covered with it's plastic when I applied the plum glitter then after a few mins drying time, I removed the plastic and used Dazzling Diamonds on the center heart. Very effective.


I stamped the definitions Inspire, Create and Delight from the Life Definitions (pf 123) stamp set and glittered the edges of the pale plum mat.
I then coloured some White Grosgrain ribbon with Pale Plum and Perfect Plum ink using the sponge daubers to transfer the colour to the ribbon. I cut the newly coloured ribbon and added some Very Vanilla ribbon to the mix and tied them to the spiral binding on the Journal. I then added a few little butterflies and a ribbon along the edge and hey presto all done!

I hope this inspires you all to go and create!!!
Till next time. Cheers, Kasey

05 May 2009

First Page!


This is my very first scrap book page and one of the first photos taken of Blake after he was born. It's such a beautiful photo. I'm hoping that my scrapbooking improves along the way!

04 May 2009

Danielle's Birth Announcement


I created this to celebrate the birth of my beautiful granddaughter Danielle Leigh. Along with a matching card. I hope you enjoy it and it inspires you to create.