Followers

25 April 2013

Taking a little break...

Hey all, just a quick note to let you know I'm taking a little break.  I'm moving my craft room and that involves so much!  I never ever have to buy another piece of patterned paper, I have so much of it.  I'm sure there are quite a few out there who are in the same boat.

I'll share some pics in a few days once I get sorted. 

Have fun creating!

Cheers,
Kasey

21 April 2013

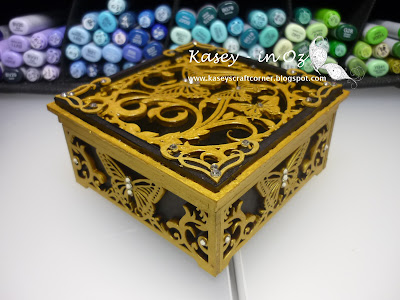
Butterfly Trinket Box

Oh my, have you seen these boxes?  Aren't they amazing? 
These gorgeous Butterfly Trinket Boxes are available for a limited time only from Make It Crafty
.


 I've painted the decorative sides and lid in gold metallic paint and the actual box sides and base were painted flat black outside.

 Of course, no project is really complete without adding bling!

 After the gold paint was dry, I gave the lid a couple of coats of UTEE (Ultra Thick Embossing Powder) This has sealed the lid with a high shiny coat.  The black border and gold painted Ornate Corners chipboard corners were added later.


I got some sticky backed felt and lined the inside of the box, I think I might have forgotten to paint the edge black!  LOL Don't you just love noticing things like that when you go to post the pictures!

Here are the details on this adorable little box

Size once assembled: (all sizes are estimates)
Approximately 10cm (4")
Height: 50mm (2")
What you receive:
  1. All pieces come pre-cut for you to assemble
  2. Step by Step photo instructions
What you will need:
  1. Wood Glue
  2. Undercoat Paint Sealer
Cheers

Kasey

19 April 2013

It's SHOWTIME!


Let us Entertain You!!
It's SHOWTIME at Make it Crafty!


We're a tapping our heels together with a tap a tap tap,
Clanging the symbols and beating the drums with a bang a bang bang,
Pulling rabbits from hats and lifting our legs - oooooohhh ahhhhhhh,
Singing our hearts out and jamming to the beat -  doo do do daaaaa...


It's time to be entertained at Make it Crafty with the
new Entertainers Collection of digi and rubber stamps!

You'll find all the new digital stamps here and you can now pre-order the rubber stamps here!


You can't have a GRAND SHOW without a DOORPRIZE!
Hop on through to be inspired and leave comments along the way for your chance to
win hidden prizes and be in the draw to win one of the grand door prizes!

One person will win the full collection of digi stamps
and another will win the full collection of rubber stamps!

ENJOY THE SHOW!!


Hop List
Jenny - Special Guest - http://jenniferds.blogspot.com.au/
Kay - Special Guest - http://kaym74.blogspot.com.au/
Stephanie - http://mycardshack.blogspot.com

Wow, you will be literally blown away by this release.  The images in this collection are so AWESOME.   I certainly was and loved so many of them that I created several projects.  So grab yourself a comfy seat and a cuppa and settle in for a fabulous show.

Meet the Paper, Rock, Scissors Band!  These guys really rock.   I have to say that my background was three different things before it became a backdrop of all C9!  Yes I had to order a refill, next time I think I'll just use black card and fussy cut them all out!  LOL at least I had fun with it. 

 The lead guitar and lead singer are both fussy cut and mounted on foam squares to give a 3d effect.

Let me introduce you to the Paper, Rock, Scissors band.....


On the drums we have  Drummer Dude


I realised too late that his belly was showing, after I'd coloured it blue!  Sigh


Our super cool base player Rocker Chick ads some rockin back beat to our sweet music. 


I added the spot on her singlet with a sparkle of pink an gave her John Lennon blue glasses, perhaps they need to be a little darker, I also put some glossy accents on her guitar to make it shine.


Slammin' it out on lead guitar is Rocker Dude


 His guitar has also had a glossy coating so it shines.


This groovy Rockstar Singer makes up the Paper, Rock Scissors band and what an amazing line up it is.


These guys and gals are awesome, head on over to the Make it Crafty store and grab them so they can rock your world!
  
 Copics used for the Band

B91; 93; 95; 97; 99
R14; 17; 43; 46; 56; 59
BG72; 75; 78
B0000, 00; 04

E000; 00; 01; 11; 13; 15; 19; 21; 25; 29; 31; 35; 37; 40; 50; 51; 53; 93
YR000; 01; 02; 04
RV14; 17; 19
V0000; 000; 01; 04
C1; 2; 3; 5; 7; 9
Y26; 28
0; 100; T2


My next act is a far cry from a rockin' band, it's a Night at the Opera!  with these amazing characters. 


 I've actually altered the Grand Opera Theatre for this piece there are private boxes on the walls either side of this amazing stage.   You really have to see it to believe how awesome this collection really is.  

I flipped the male singer around so the singers were facing each other rather than soap opera style with his back to her.


Copics used for the Grand Opera 
Y26; 28; R14; 17; 22; 27; 35; 46; 59; E000; 00; 01; 04; 11; 21; 25; 29; 37; 39; 35; 81; 93; 99; B00;W0; 01; T2; C2; 5; 7

And now for the finale, here is something just a little bit saucy!  One of the fabulous things that Zoe is doing is releasing some of the images in rubber!  How exciting is that?  


Here is one of the amazing Can Can Dancers, I just love the sentiment! I decided to make another smashbook page, I seem to be creating a lot of them lately.   I created her with greyish hair because to me that made the sentiment mean so much more!


I used some frosted lace stickles on her petticoat.  Love how it sparkles.  I apologise for the photos, they aren't as clear as they could be. 

Colours used R56 and 59 on the petticoat, R81, 83 and 85 for the dress and feather.  C3; 5; 9 for her hair and boots and E000, 00, 01, 11 for her skin.

Well congratulations on making it this far.  Thank you for taking the time to get this far, it was a very long post full of entertainment for you. 

Don't forget the door prize, you could win the entire Entertainers collection!  so leave comments on all the stops along the way!

Cheers,

Kasey

15 April 2013

Make it Crafty inspiration ~ Voiding the Warranty....technically no, but the idea is to think outside the square and use something for other than the intended use.  My project turned into a tutorial!  I've been playing around with some Impasto Paste and thought about using the Chipboard negatives to create my own unique embellishments.    

To get started you will need some chipboard negatives, I've used Delicate Butterflies, I removed all the chipboard and sprayed the negative with a matt sealer to help protect the chipboard from the moisture in the paste.


 Next using a flexible pallet knife, and Impasto paste (not gel as this dries clear), lay the template on some cardstock and spread the Impasto paste onto the area you want to use.  I'm using the three largest butterflies.


Very carefully dab over the impasto with some lightly balled up plastic wrap, this adds texture to the paste, you could leave it smooth if you wanted to.  The next two photos, show you both ways.

This takes a little while to dry, so put it aside for a few hours and come back to it to colour them with your copic markers.  I've used very juicy markers and gone over the colours, remember to wipe the tip of your marker clean when you do this.

  I've used the large butterfly to make my card, I have a gold leaf pen and rubbed it gently across the highest parts of the texture to add a touch of gold.


And here is the finished project.  I've sponged Rusty Hinge and Wild Honey distress inks on to apricot card, stamped the swirly flourish in Gathered Twigs DI and added some pearls and ribbon.  No sentiment as yet, I'll add one when I know what I want to use the card for.
So while you may have thought to use your chipboard negatives as part of your project, I hope you will give this a try so you get more for your crafting dollar and use your items for more than their original purpose.

Cheers,
Kasey ~ in Oz

11 April 2013

Product Spotlight - Make it Crafty mini printers tray.

Hello there, I'm here today to show you one of these fabulous little printer’s trays that Zoe has made. They come in a kit and you just glue them together and decorate.  Easy Peasy!

I gave my Circle Feature Printers Tray a couple of coats of off white acrylic paint, I used Jo Sonia as it is quite thick and covers well.  I had picked up a Graphic 45 paper stack on sale called Once Upon a Springtime, it’s lovely old fashioned fairies.  I also got this fabulous silver fairy charm so I built my tray around these things.
 I’ve used MiC Heart Flourishes chipboard and embossed it with silver to match in with the charm, I love how delicate Zoe’s chipboard is.

 I’ve also used up a lot of my tiny flowers, rosebuds and little roses, pearls and chipboard butterflies as well, I loved using all of these tiny embellishments to create this gorgeous little decorative piece.
 

 The butterflies are from two different sets, Butterflies and Leaves and Mini Butterflies, both painted with metallic paints.

I hope you’ll give one of these gorgeous little printer’s trays a try, they are such fun to decorate, they come with two options for display, a stand or a hanging attachment for the back.  They measure up at approximately  Width 120mm (4.75″)   Height: 165mm (6.5″)  Depth: 12mm once assembled.

Cheers,

Kasey ~ in Oz


08 April 2013

Fairy Tree House Wonderland

Hello there, Kasey here with a wonderland project for this week's MiC inspiration.  I have posted this little fairy house on my own blog before and I finally got a frame for it.  The frame has a large white border and when I put the Fairy House picture into the frame, it got a little lost, so I had this great idea of printing out more of Zoe's sprites and adding them to the image.

Here is the end result, I've taken the photo without the glass on as I couldn't get a clear shot without a lot of light reflecting.  My granddaughter asked what the fairy's names were, so I went back to my files and got their names and wrote the name next to the image with a multiliner, now when she asks me I can easily remember all 11 fairies!


Usually, the DT give you a list of all the copic colours used, I have to say, if I did that I'd be here all day!

And this is just the ones used on the 8 sprites surrounding the Fairy House!  I didn't capture all of the ones used in the main image, sorry!  

Here is a list plus closer pictures of all the Make it Crafty images used.


 Cici  


 Jojo


Whew, you made it through this picture heavy post, congrats!  Thanks for taking the time to stop by, please let me know you visited by leaving a comment, I read them all and I do appreciate my visitors. 

I'm adding this project to Make it Monday linky party!
 

Happy crafting. 
Cheers,
Kasey


04 April 2013

The Southern Girls challenge this week is Stripes!

I've chosen to use 'A Little Bit Grumpy' from The Paper Shelter, she has stripes on her stockings and gloves! and I've teamed her with Bo Bunny papers in just the right colours and found some fabulous bright flowers in green and purple.  I've also used a Marianne Die as some foliage. 


I hope you dig up some stripes in your stash and enter our challenge!

She's been coloured with copic markers.

Skin:  E000, E00, E01, E11, R20
Hair:  RV000, V01, V04, V06, V09
Wings: YG000, 03, 05
Dress:  RV000, V01
Stockings and gloves:  RV000, V01, YG000, YG03

Cheers,

Kasey

01 April 2013

Cheeky Elf

Hello there MiC friends, I'm here with another inspiration project for you, this time the DT have been challenged with creating something amusing.  

Well, I thought of several ideas then when I was looking through the images I had, this little fellow sprang out at me.  

Now don't be fooled into thinking he's a sweet and innocent character, you do see him sitting on his behind looking a little dizzy don't you?  Well he's been into the eggnog and drank way too much!


Hope you're inspired to create something amusing this week.

MiC products used

Scruffy Digi Stamp
Make it Colour blending card
Copics used
Skin: E000, E00, E01, E11, E93
Clothes, shoes & hat: G17, YG09, YG05, YG03; R46, R43, E13, E23
Gold leaf pen on the bells and multiliner to redraw the details on them.

Cheers,

Kasey