Followers

31 May 2010

Gilded Rose

I thought I'd try my hand at embossing the embossed!


I was a bit disappointed to see that the embossing powder stuck to the petals even though I know there was no versamark there and I'd dusted the cardstock with the embossing buddy, well I decided to heat it anyway and I'm thrilled with the effect.  What do you think?

30 May 2010

Vintage Look

I've been experimenting with making a background using versamark and glitter enfused clear embossing powder, I've gone a little overboard as I've covered the flowers with this as well.  Every girl loves Bling!  At least that's my excuse.


I've taken this pic with the light hitting one side to show off shine on the background, although you can't really see the glitter.  I used the rock n roll technique with versamark and Elegant Eggplant the colour of Almost Amethyst deepens with the versamark.  So there you have another creation to inspire you.  Yes I'm using up the purples while I still have them!!!

More reinkers and rubbing alcohol

I was showing this technique to a friend and used Bashfull Blue and Sage Shadow on Glossy White card stock, we both turned out such different effects, so it really depends on how wet your cotton ball is with rubbing alcohol and how many drops of each colour you use. 

I ran my piece through the Big Shot using the Manhattan Flower embossing folder and then lightly inked the raised edges in Bashfull Blue using a ink dauber.  Then I traced the outside line and drew another line about a 1/4 inch away and cut so have the blue shadow behind the image.  I then lay a strip of white grosgrain ribbon across the Sage Shadow inkpad and sponged it, it turned out much darker than I expected but I really love the colour.  I'm going to miss Sage Shadow.......*sigh*

It hasn't shown up well in the photo, but the edges of the salutation have been sponged in Sage Shadow to deepen the colour to match the ribbon, it is really close but doesn't look it in the pic.  Oh well, you get the idea anyway.

28 May 2010

Tri Fold Shutter Card

This is one very easy card to make and has that special look.  This tri fold shutter card stands freely when opened, making it ideal for display.

The tutorial can be found in the resources section on the splitcoaststampers site. 


I've used the largest oval from the Original Dies Ovals then using the corner rounder, I've scalloped the edge, the next size down oval fits snugly inside the scallops.  I've used the Echos of Kindness words,  Cottage Garden stamp set and the Cottage Wall DSP with Rich Razzleberry and textured Going Grey 12 x 12 sheet for the card base as it's a 5'1/2" x 12" base so you need to use 12 x 12.

Always

I CASED this card months ago from Split coast stampers and unfortunately I can't remember who orginally did it.  My apologies.

It's using Purely Pommegranate one of last year's In Colours, white embossing powder and versamark and Purely Pommegranate ink with clear embossing powder to get the coloured heart.


I have to really push myself to use these murky greens they are not the first colours I reach for, usually I'm a purple/pink/blue-green sort of girl and the yellow-greens, yellow's and oranges etc get left alone.  

I'm really so sad that most of our lovely purples and blues and greens are being removed from the colours available.  I might be wrong here but I think the new colour choices are pretty heavy on the earthy tones, there doesn't seem to be crisp clean bright colours coming into the range.  Maybe the incolour ranges will include those sorts of cololurs.

Anyway enough of my ranting!  Here is my green effort.  Yes, a touch of Rich Razzleberry to keep me in my comfort zone.

27 May 2010

Sweet Treats Sunflower

Hello again, I finally caved in and bought the bird punch, I'm not big on using animals in my cards, not sure why, but this little wing can double as flower petals so I created this Sunflower using the Sweet Treats Cups and Summer Sun (wing) petals, I inked the edges with Pumpkin Pie and layered the bottom layer as is then cut a small piece out of the bottom of the top layers so they fit snugly against the cup.  I filled the cup with little seed beads in Orange, Yellow and Copper to make the centre of the flower.  The sentiment is embossed with clear embossing powder with a dash of Dazzling Diamonds through it.

I cut a small strip from the front of the card and put a small strip of Haiku Designer Series Paper.  I love how this turned out. 


 Next Idecided to try actually making a bird card, I do try to challenge myself now and then to step outside of my comfort zone!!!


 I"ve used Soft Suede, Whisper White and Kraft along with some polka dot Soft Suede ribbon and a few Vintage Brads.  Add a little label and it's all done!


I was also playing around with a few bits left over from other projects and turned out this little card, I'd been testing out the Polka Dot embossing folder and thought the Flower Punch would work nicely with it.  Pretty happy with the result.


 Cheers for now, I'll be back to post some others soon.


Kasey

24 May 2010

C.A.S.E.D Top Note card

Hi Again,  I've been busy surfing blogs and found the most beautiful card which I took inspiration from, it's not a complete case but close to it!


If you'd like to see the original it's here  an Inkspirations winner.  Once again I've used a little bit of glossy card which has been coloured with reinkers and rubbing alcohol, I love the marbled look it gives.

Cheers for now.  I have to go back to my craft room...I'll post some pics of that when I get it cleaned up!

22 May 2010

Other recent creations

I almost forgot to post these other creations, I've been challenging myself to make at least two cards using the same stamp set lately.  Here's my effort with the Mini Catalogue Level 2 Hostess set Asian Artistry.


I tried my hand a water colouring, not too bad an effort, I really need lessons on that one!


Cheers for now.

Purple Haze

I'm in a purple haze faze today.....friends will say 'What else is new?'  LOL  Well I do use other colours but I was surfing blogs for inspiration and found a wonderful tutorial on using reinkers with rubbing alcohol.  So...I thought I'd give it a try.  You can find it http://inkeverywhere.wordpress.com/


I've used Fifth Avenue Floral for the flowers, the Top Note, and dots embossing folder, eyelet lace border punch and the Sizzlits 4 pack die labels for the sentiment,  I was going to set brads in the label but then it looked good with just the hole so I left it like that to match the eyelet lace.

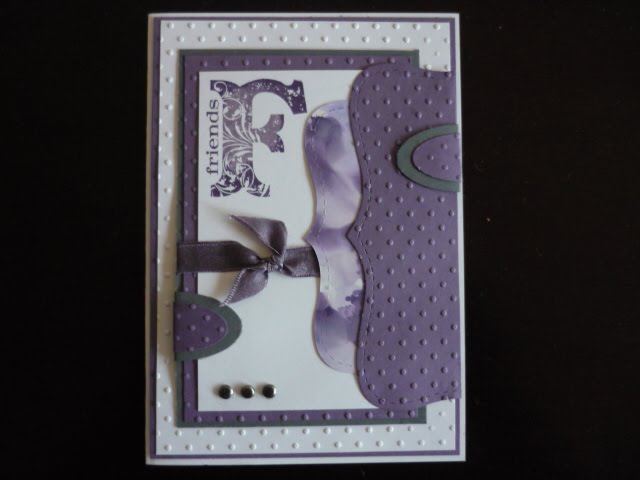
Using more of this technique, I made this card, the Top Note is stamped with the flourish from Brocade Basics and is then I trimmed away the perforated border and mounted it on Elegant Eggplant


I've used the half pearls from the Pretties Kit and stuck them down with glue dots.  The small flowers are embossed with a mix of Clear Embossing Powder and Dazzling Diamonds, can't see that well in the photo.

Hope it inspires you to experiment with different techniques.

16 May 2010

Vintage card.

I just love the look of the Vintage Vogue stamps and Very Vintage wheel.

Here are a couple of cards I've made using them.  (above) This one was for my mother for Mothers day, it's a bit hard to tell in the photo but the 4 small flower centres are Crystal Effects with a sprinkle of Dazzling Diamonds and an Ice Rhinestone brad used for the main flower.  The colours are Rich Razzleberry Whisper White and Mellow Moss.

Below is the Very Vintage wheel and the Cottage Wall designer series paper, I've used a designer brad for the flower centre on this one.

14 May 2010

Masculine Card effort


I've always been a bit hesitant to throw out the scraps left over from mounting the new stamp sets when they arrive. Now Stampin' Up! has the unmounted stamps, the idea came to me to make my own background stamp out of the scraps. I cut rough squares and rectangles out of the surrounding rubber and then placed them on a large acrylic block, inked them up and stamped the card front, I also stamped this one with sanded as well. The various slight differences in the thickness of the rubber gives you the variations in depth of colour. Don't be too fussy with completely covering the rubber with ink, it's meant to look rugged.

I'm finally back posting again!


It seems like an age since I last posted here, but then a lot has happened in that time. I've moved to North Queensland and am not back creating again. This card is one that I have done for a swap that I'm in with two friends and Stampin' Up! demos in Canberra and a new friend and Stampin' Up! demo here in Townsville. The girls should get their cards in the mail next week.