Followers

30 March 2013

TPS Anything Goes!

Don't you just love the freedom of an Anything Goes challenge?  The Paper Shelter is having one and I created this card for it.

I purchased this image quite some time ago as it reminded me of the Sulfur Crested Cockatoos that live here in Australia.  This little guy just reminded me of the tough biker dudes of the 50s and 60s (think James Dean or the Fonz), by today's standards they were pretty clean cut.  It also had the Steppenwolf song Born to be Wild running through my head.  It was first released in 1968.

 Thank you to my lovely blogfriend and fellow ex DT mate Debbie P for her assistance in creating a watermark for my pics.  I've used Cockatoo Rules and the paper from Gothic and Modern as they just seemed to fit together.  I created the sentiment on my computer and added the little guitar charm.  I kept the card very simple to show of the fab paper and image.


Entering this bad dude into The Paper Shelter challenge 105

Cheers,
Kasey

29 March 2013

Spring is Here - Make it Crafty bloghop

Well OK, if you're in the Southern Hemisphere, you're saying 'No it's not!' but certainly for the Northern Hemisphere Spring is Here, so to help our friends and neighbours celebrate, MiC is havinga Spring is Here blog hop.

Some of you will know I've just finished painting my granddaughter's bedroom, it's all pink and white.  I've started doing some fairy scenes to frame for her walls and this is one of them. 


 Here it is in the frame, I've merged three MiC images together.  


 Here is a picture of the copic colours I've used here,  too many to list individually!  I've also added some soft glitter by using the Atyou Spica pens.

Thanks so much for hopping along on our Spring is Here blog hop.  I believe that Zoe has a prize for this bloghop, there is a special Spring themed stamp NEW and not yet been released, so leave some love at each blog stop and you could win.  Even the DT haven't seen the prize yet!!!

Kasey (you are here)

Have fun hopping, LOL it IS Easter after all.

Cheers,
Kasey ~ in Oz 

25 March 2013

Groovy Chick layers for Make it Crafty

Our inspiration theme at Make it Crafty this week is Lots of Layers, now I love layering my patterned papers and I usually go for either Vintage/Shabby Chic or CAS, I'm not sure this fits in to either of those categories as Holly-Rose is kinda Retro so that's what I did, lots of layers and what's more retro than powder blue?


The image is definitely minimalist in the colouring, clothes are three colours used and hair is two!  I wanted something very fresh and light.  For her clothes B0000 and B00 with a wash of 0 just to fade it all out a little.  The trim is Y38 with Gold spica over the top, her shoes are also gold spica pen.

Her hair is just E40 and E42 that's it! Oh and some white space at the lightest parts.  Skin tones are my go to colours that I use mostly, E000, E01. E11 and R20.  I've coloured Holly-Rose on Make it Colour Blending Card


I had this paper stack from Me and My Big Ideas and it was a perfect match right down to sparkly embossed flowers, so a little bit of fussy cutting and I had my embellishments.  So all up there are more than 10 layers in my project, I think that fits the bill!

Hope you have fun playing around with your layers.

Cheers,

Kasey ~ in Oz

20 March 2013

Tangling for fun

Hello there, I've been a bit lost in my craft room lately, dabbling a little here and there but not actually producing many finished items.  I have been doodling though, doing some Zentangle inspired art.  Some of these have been inspired by some very talented artists out there, take a look at Zentangles or Tangles on Pinterest sometime and you will be amazed, there are lots of 'how to' images as well.

 I love just zoning out which is the 'zen' part of the whole tangle process.  Lots of there have been created while I was watching TV (sort of)
 I find interesting patterns and then try to emulate them, they come out so different though as I usually add my own twist to them.

 These two, top pic and bottom pic were so much fun to create, I love the tangled spaghetti below, drawing this was really easy and interesting to curve every which way.  I've inspired my grandson to pick up his pencil and start drawing again.

Hope you give this form of doodling a try, there is no right way or wrong way, just whatever flows from your pen.

Cheers for now,

Kasey

16 March 2013

Joint blog hop Make it Crafty and Tiddly Inks go Egyptian

Hello everyone, Welcome to day two of the joint release of Egyptian Themed images from Make it Crafty and Tiddly Inks.

If you want to join in on the fun.....Head here to day one to start your Archeological dig for the clues, there are some great prizes to be won.

My inspiration project is using the MiC Hieroglyphic Wall merged with Cleo Walk the Walk from TI to make this page in my journal.

 I've used lots of gold strips to form frames around the image and edging the outside of my frame.  I've also used some of Zoe's gorgeous chipboard corners painted gold, I had a little accident with the gold leaf pen and ended up with a squiggle on the black page from my fingernail.....Noooooo.  Well a mistake is always a creative opportunity so I used the same nail and added more squiggles all around as another border.  Sort of gives a marbled effect.


Here's a close up of Cleo walking her walk!  No Queen of the Nile can go without her adornment so I've added lots of bling!
Copics used
Skin: E0000, 000, 01, 11
Hair: C5, 7, 9
Background:  E40, 41, 42, 43, 44 Gold and clear spica pens, B00
Dress and Circlet:  Y26, 28, gold, clear and lipstick spica pens

Don't forget that aside from the clue finding, if you want to snag yourself some of these fabulous images both stores are having a sale!


Cheers,
Kasey ~ in Oz

11 March 2013

MiC inspiration - Aleisha Clean and Simple

Hello MiC fans, I'm here with this weeks theme of Clean and Simple, sometimes I look at some of the cards made with copic coloured images I see around blogland and they are amazing works of art, really layered and detailed with loads of embellishments and quite frankly they scare the pants off me!  WOW how do you compete with that? 

Well, you know what?  You don’t have to, all you need to do is develop your own style and I’m here to show you that you can do CAS with amazing images like Aleisha from Make it Crafty and this style really helps to let the image and your colouring be the focus of your project.  Don’t be afraid of white space!


I've layered a spellbinders labels 24 die cut twice, I placed one on the diagonal and cut the other into 4 pieces which I positioned on the corners.  These ties are squarish and I needed a rectangle shape for my image, so I improvised.

I hope you take some time to try out a Clean and Simple style project sometime soon!

Products used

Make it Crafty Digi Image – Aleisha
MiC Blending card

Spellbinders Labels 24

Copic markers
Hair:  E15, 21, 23, 27 & 29
Skin: E000, 00, 01, 11
Eyes: B34 & BV11
Bows and Top: Y000, 02, 06, 08, 11, 15, 17, 19  (yes overkill on the yellows!)

That’s it from me, thanks for your lovely comments on my last MiC project.

08 March 2013

Tag you're it! at the Southern Girls Challenge

Hello there.  Welcome to a new challenge this week at the Southern Girls Challenges, this time we're having fun with Tags.

I've used Stampotique Originals  5069: I am my Art and 6056: The Crafter  

 My background has been created using some distress inks that I added to my stash recently, I've stamped my Crafter in Stazon ink as it's the blackest ink I have, she still looks a little faded but I think this adds to her charm.  I've added lots of pearl bits and bobs and some fabric roses and an amazing plastic fan which I coloured with copic markers.

This is a little outside my normal style but it's in my go to colours!  I love that we can experiment with different techniques and mediums and find the ones that spark that flame of creativity in us. 

Hope you like my little side step into making an artsy tag.

Cheers,

Kasey ~ in Oz  

03 March 2013

Child's room art

 Update:  This project won a top three spot at 2 Sisters!
___________________
Hello everyone, I've had this little project completed for a while now I'm still waiting to find a frame for it as it's destined for my granddaughter's bedroom wall.

This is my first play around with Paint.Net and merging digital images to create a scene.  I've used Make it Crafty images to create this little fairy house.
It's on an A4 sheet of copic blending card.

 First picture is the Fairy Tree House in total.

 This little fairy is Vixie, she has lots of sparkle on her wings, which unfortunately hasn't come out well the photo.

 This is fairy star, she also has sparkles on her dress wings and wand.  These little fairy images are re-sized to be about 4 or 5 cm tall.


Finally Fairy Twinkles, now her hair is all glittery but it just looks a bit messy in the photo, it really does sparkle though.

I hope you like my Fairy House.  I'd like to enter the following challenges.

Lady Anne's Challenges Vickie's Challenge - Anything Goes

Sandy's Crafty Creations - Anything Goes (with a twist) Shades of Green
The shades of Green was optional, however I have used many different greens in this picture.

One Crazy Stamper - Anything Goes

Two Sisters Challenge Blog - Fairy Tales/Fantasy

Thanks for visiting.


Cheers,

Kasey ~ in Oz


25 February 2013

Butterflies and Bling at Make it Crafty

Hi there everyone, this is really exciting to have my first inspiration post for Make it Crafty.  I've posted in two blog hops so far but this is the first time being featured on the store blog!  It's sooo cool.  I've used Crystal Digi stamp and done her up in fresh and light colours.


  The Butterflies have been painted with a shimmery white then I went over them with a lilac mica spray to give the slight hint of colour and of course all the bling.

(sorry, blogger is not cooperating on this second pic)
 

Make it Crafty products used

Copic colours used
Skin:  E0000, E00, E01 & E11
Hair: E21, E50, E51, E53 & E33
Dress and Shoes: B60, B63 B66, BV0000, Y000, Y11 & Y15
Rose: YG63, YG67, RV52 & RV55
Background: B0000, B00, V000, V01 & 0

Thanks for stopping by.

Cheers,
Kasey

24 February 2013

Celebrate

Stop Press!  This little Gypsy scooped a prize in the Paper Shelter's Celebration challenge!   Woooo Hooooo!
 

Hi everyone, well I managed to get into the craft room and guess what?  Only ONE card was made.  I can't believe it took me so long to clear a space to colour!   I saw that the Paper Shelter is celebrating their 100th challenge so I decided to give it a shot, I also picked out a sketch to use but that challenge had closed.

I used Gypsy Dance for my image she's such a cutie.  Love the flowing dress and hair.  I thought she needed a red rose in her hair too.  Lots of shimmery spica pen on her top and necklace and earrings too.


Here is the full card, I've used the bohemian range from Kaiser as it fit the gypsy theme so well.  I've kept the card fairly simple as there are a few layers and busy papers.  

Copic colours used

Hair:  C3, 5, 7 & 9
Skin:  E000, 00, 01 & 11
Dress:  R59, 46, 17, 14 & 12.  Y26 & 28
Clear and Gold spica pens

Thanks for dropping by to say hello.

Cheers,
Kasey

22 February 2013

Make it Crafty ~ Gift for a friend blog hop

Hi everyone, I'm really excited to be taking part in this Make it Crafty blog hop!  We have some amazing projects to show you today, I'm so honoured to be working along side these awesomely talented ladies.

Today's post is really exciting for me, I've had a play with the fabulous Make it Crafty 3D Chipboard kit using Shadow Box Square Frame Kit.  It was awesome to put together, the finish is so neat and perfectly aligned.  I also have used the Antique Flourish chipboard set, I love the flourishes and the heart is just stunning.


If you visit my blog regularly, you would have seen that my daughter recently got married, her niece was flower girl and I just LOVED this photo of her collecting shells on the beach when the bridal party went to have some photos taken.


 I put the frame together, leaving the stand until last, gave it a coat of metallic gray acrylic paint.  The chipboard was painted with Platinum paint and the photo was printed and mounted on a mat of Gray card with a fine shimmer and then on the blue metallic paper that I'd used on the wedding invitations.


 Some closeup shots of the embellishments, a little cluster of roses, some blue rhinestones and strings of pearls.
 The heart is so delicate and gorgeous, I really love how elegant all this gorgeous chipboard is.

 This picture is taken on the angle to show you the depth of the shadowbox frame.  I hope you're inspired to try one of these amazing kits yourself.

Next in the line is....Ã…sa

And in case you need it, here is the list of DT Lovelies who are participating in this bloghop


Kasey - You are here


I just know you're going to enjoy this bloghop!

Thanks for leaving your lovely comments, they are very much appreciated.

Cheers,
Kasey ~ in Oz

A Sad farewell to Delicious Doodles DT from me

Hello everyone, this is my last post for Delicious Doodles, Teri has kindly agreed to allow me to step down from the team. Life is a little too hectic for me lately and it doesn't seem to be slowing down at all so something has to give.  (currently on crutches as I tore something in my knee, pending results with Dr next week) 


There are a few of us who have stepped down, but that is good news for you if you're keen to join a fabulous design team and work with Teri's amazing artwork, check out the Design Team Call.  I've loved working with these gorgeous digi's and the team are amazing bunch of girls.  I will miss them all! You will still see me using Delicious Doodles images as I love them so much.


The challenge this week is Flowers for Spring.   

My card is a Thank You card, for Teri, for the Design Team and for you for dropping by my blog each challenge to leave me lovely comments.  THANK YOU All.

I've used one of Teri's latest images here, the amazing Lily and Butterfly.  It's got this gorgeous frame which I've coloured over the gray design

There is a whole new range of these lovely flower frames with different flowers, frames and butterflies.  You will LOVE them too!  Check them out for yourself over at Delicious Doodles store.

I hope you'll join our challenge and show us some Spring Flowers!

Cheers,

Kasey ~ in Oz

18 February 2013

Just playing

Hello there, I've been playing!  I love being able to try out new techniques and also making my own background papers.  I picked up some Impasto Paste and have been playing around with it and made this textured background.

For this background I spread a thin layer of Impasto paste over a 5 x 5 piece of white card.  then I bunched up a piece of plastic kitchen wrap and dabbed it over the wet paste to create an abstract texture.

Once this was dry, I sprayed some of my much loved Lindy's Stamp Gang mica sprays on it and let it dry again.  I chose colours that would compliment this fabulous image from Make it Crafty.

Anastasia is the image I've used here, it's a Make it Crafty digi, she has been in my collection for a while now, with all those curls and little flowers I've been a little daunted by her but I finally took the plunge and coloured her up.  I hope you like what you see.

 I've taken a few pictures on different angles to try and pick up that shimmer and shine that has collected in the texture.

This final picture shows the Make it Crafty chipboard corner, I sprayed it with the same gold mica spray.  I love how delicate this chipboard is, gorgeous to work with.


I am entering Anastasia into the following challenges.

No Matter Which Challenges - Ribbons and Bows
Dream Valley Challenges - Ribbon and Bling  - My bling is the mica spray and spica pen glitter on the image. 
Challenges 4 Everybody - Anything Goes

Thanks for stopping by to say hello.  I appreciate your visit and love reading your comments.

Cheers,
Kasey ~ in Oz


10 February 2013

Mysterious Valentine

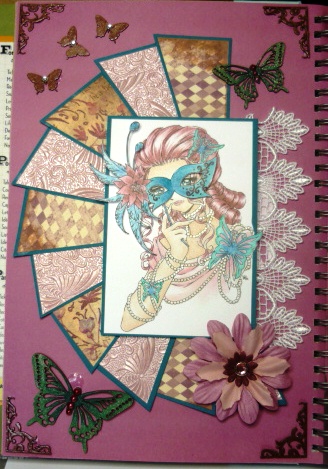
Hi everyone, I've got a little smash book page to show you today.  I've picked up some Prismacolour pencils and here what I came up with in my first play with them.  I used Ruby, a fabulous Make it Crafty image from the new masquerade range.  

Ruby comes with two different masks and you can use a program like paint.net or photoshop to put her mask on or like me you print it out and pop it up on top.  I cut tiny little holes to put the stem of the mask in her hand.


 This is the full page, I had this idea going round my head to make a fan, I have images from the movies of masquerade balls with gorgeous dresses, lace fans and glittering masks.  I used some textured pink butterfly paper that I've had for an age as it fit the theme perfectly.

The chipboard here is from Make it Crafty I love how delicate Zoe makes her chippies.  Gorgeous to work with and perfect for cards.  Here I've coloured the butterfly with BG13 and BG57 then coated it with clear spica pen, it's gone a very different colour with the spica over the top, it seems to have added more yellow.  still they do look so pretty.

The corners are painted with nail polish!  two coats of colour and one of clear to bring  out the shine just like you would paint your nails!  

I'm entering Ruby into the following challenges.

Our Creative Corner - Picture inspiration - Mask
Make it Monday - Anything Goes
Flutter By Wednesday - Anything Goes (butterfly or fairy)
In the Pink - Pink Valentine  (Valentine's are usually a mystery hence the mask)

Thanks for stopping by, it feels really good to be back creating for challenges again!

Cheers,
Kasey ~ in Oz

08 February 2013

Delicious Doodles Challenge #22

Hi everyone, the Delicious Doodles challenge this week is to not use patterned paper.  For me that's pretty easy, I have stacks of paper and quite often, I forget to use it as I usually use inks and stamps to make my own papers or I use embossing folders for texture.


I've used Steampunk Fairy and teamed her with some Tim Holtz Weathered clock and gears dies and embossing folder, sponged a little gray ink and added some netting and a lovely metal corner and some fancy metal flowers and brads.  all done!  simple and easy.  Again, I seem to still be leaving off the sentiments.

My Steampunk Fairy has been coloured with Copic markers. 

Hope to see you joining in at the Delicious Doodles challenge this week.

Cheers,
Kasey ~in Oz