Followers

08 December 2013

Faith

Perhaps at this time of year, Faith is a very apt topic for an Art Journal page.

This sort of just happened, I had the concept for the page and once I had torn a few pages out of an old encyclopedia I found that they were mostly about religions, a few were about politics!  LOL two subjects my Grandmother used to say never to discuss.

The words are from a post on FB and I'm sorry I can't find it again now to give you the author.


Look at all that luscious texture and shimmer.  The texture comes from serviettes or the white backing paper and the shimmer comes from an iridescent paint medium brushed over the top of the Dylusions inks.  A little texture paste, some of the circles have been coloured with a weak solution of the same Dylusions inks and some left white.   

Hope you're inspired to create your own Faith page.

Cheers,

Kasey

14 November 2013

My love affair with Creative Journaling continues

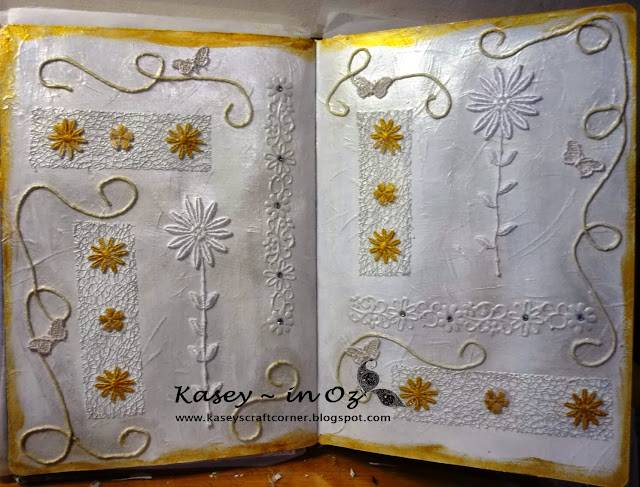
Hello there friends, I've been playing around with some pages and not yet added any text, perhaps I won't as I really like the way the pages look now.


With this first page I was going for an all white look which ended up being pearl and gold, but you know how these things just flow and what you set out to do sometimes takes an unexpected turn.  I've used gesso and then some trim string and lace dasies and butterflies.  The pages were painted with a irridescent paint finish which turned the stark white of the gesso to a rich pearly sheen.  I thought I'd just add a little bit of colour with some Gold.


This next page is an acrylic paint background, with gesso over the top to soften and blur the edges, then a thick layer of crackle paint and stormy sky distress ink rubbed over the crackle.  I then added the texture paste and stood back and looked at it and thought it looked like a fancy trellis so then came the idea of using up some of my flower stash.  a little bit of lace and some awesome bling.  Page done!

With this close up of the bling, you can also see the gorgeous texture of the crackle paint.  I'm really super happy with this spread.


Thank you for taking time to stop by for a visit.

Cheers, 

Kasey

12 November 2013

Little Boxes

While not quite old enough to remember this song, it was released in 1962, I do remember it being played on the radio.
 
The song Little Boxes was released by Malvina Reynolds, here is an excerpt from wikipedia.

The song is a political satire about the development of suburbia and associated conformist middle-class attitudes. It refers to suburban tract housing as "little boxes" of different colors "all made out of ticky-tacky", and which "all look just the same." "Ticky-tacky" is a reference to the shoddy material used in the construction of housing of that time.


When I started to create this page, the song came to mind.


Hope you see the fun side of this.

Cheers,

Kasey

11 November 2013

L O V E

I'm still on my creative journaling path and have been having lots of fun playing around with different mediums and textures.

Normally, I'd cover the pages with inks or sprays or acrylic paint, this time I decided to leave some white space and just freehanded some lines in Magenta, Cobalt Blue and Lavender  The hearts are punched out of canvas which I got in a stack like you buy watercolour paper.  It's awesome thickness and texture.

Personally, I think the blue stamped hearts get a bit lost on the background as it's quite bold.

Anyway, I thank you for taking the time to stop by.

Cheers,

Kasey

02 November 2013

The door to my heart

I had so much fun making this page, it just came together beautifully, I got the inspiration from a lovely lady Kerry who was at a journal class I attended, I looked through her journal and was just blown away.  Some very lovely pages and she was generous in allowing me to take some photos of her work.

This is not an exact copy as with any thing that gives you inspiration, you end up putting your own creative flair into the mix.

 The Plum and Teal go so well together don't you think?  Purples and Teals are one of my favourite combinations I hope you don't get too sick of seeing them together on my projects, I do try to mix it up a bit, like with the last page all hot pink and orange!


I am really loving playing around with mixed media, like adding texture with modeling paste and acrylic paint, layers of stamps and papers and inks in my Creative Journal, the only problem is that it's getting quite bulky now and it's difficult to lay it flat for both working and taking the photo!

Thanks for stopping by to check my latest creation out.

Cheers,

Kasey 


30 October 2013

Find the Heart you're looking for

I had a lot of different ideas for this two page spread but as with a lot of things when you're creating, it took on a life of its own and I ended up with a neon page!


The lovely final touches were the metal embellishments, mostly from Wild Orchid Crafts and then a couple from Tim Holtz. 

Close up of the embellishments, I'm not normally an Owl person but this little fellow was too cute.
This is a quote from a web search on time and love and then created on the computer and cut out in a heart shape with sponged ink around the edges.


Thanks for visiting.

Cheers
Kasey

23 October 2013

Find your Bliss

Back again with another journal page, I'm particularly happy with this double pager as it's softer and I think the background layers of acrylic paint is truly beautiful which is why I left so much of it open and the layering is around the edges.


The words are cut from a Hippy Chick alpha die I got when I bought my cuttlebug many years ago.  I found the letters a little bit large for card making, but years later and they are certainly being well used now in my art journals.

I have also used a Spellbinders butterfly die as well as a Stampin' Up! one for the little gold butterflies.  I Love the liquidtex modelling paste, I left the hexagons white and added some jo sonja cobalt blue paint to a little bit and then painted a little bit of gold over the top once it was dry.

Here is a close up of all that lovely texture.  Lots of The Crafters Workshop masks used to obtain all the layers.

Thanks for stopping by.

Cheers,

Kasey

20 October 2013

Music of Life

I saw a t shirt out in the street while I was in Sydney recently and then developed this saying from that.

Love this mix of colours together, I've used Dylusions sprays, Crushed Grape and Squeezed Orange with a little bit of chocolate for the writing stencil.  The harlequin design was glass beads in texture paste with some crushed grape spray, it dried much deeper in colour than I had intended so I added some white highlights with acrylic paint.


I gave some old music sheets a coat of gesso and used that as the base for my words which are cut from a Memory box die then coloured with the dylusions inks.

There are lots of little details in that stemple paint has been used to do the white dots as it adds texture.  Some stamping and punched out hearts have been added as well as some chipboard music notes.

Thanks for visiting.

Cheers,

Kasey

14 October 2013

Pursue your dreams and unlock your potential!

Hello friends, life has a way of getting busy now and then and that usually means less time to do those crafty pursuits.  But I have had some time to play.

I have a couple of journal pages for you today.  I've been you tubing again and just love this acrylic paint background technique.  I've also used a lovely Crafters Workshop template and texture paste for the flowers.  Die cut alpha for the words. 


Lots of texture on this page, I've used some fabulous Make it Crafty chipboard, some Kaiser Craft locks and computer generated text.  Lots of layering paints and masks to create depth on the page.

Thanks for visiting!

Cheers

Kasey

25 September 2013

Colour My World

I have a new art journal double page for you today. Just playing around with some techniques and sprays and song lyrics!

I had sprayed this gorgeous background with Dylusions sprays and it just sort of flowed, then a song worm just crept up on me and I found myself humming Colour My World from Petula Clark.
 
 My lady's face is drawn using a stencil (cause I can't draw freehand to save myself!)  although I did hand draw her neck and hair.  I had lots of lovely texture in her hair and then when I painted the supposedly matte modge podge over her, it all sort of blurred.
Oh well, you live and learn!
I printed the chorus of Colour My World out on heavy paper and cut it into strips and then modge podged it down.  I had some left over canvas so I sprayed it and used a punch to get all the bright hearts. 
 I found a little packet of bling hearts and added them to her hair and scattered a few on the page for fun.  The hearts are doodled around using a black copic marker and the white is some liquid pearls to give some dimension.

I hope this colours your world!

Until next time.... Cheers!

Kasey
 

22 September 2013

I'm feeling very arty today!

I am feeling very arty lately and have been spending lots of time pouring over Youtube tutorials for art journals.  

I have to say the lovely Rach013 (youtube id) inspired this page.  Loved watching her create her mixed media canvases and I spent a lot of time surfing through her clips.  You might also like to visit this very talented artists blog.  Artful Evidence 

Thank you Rachel for your generous sharing of your techniques.

http://youtu.be/uQJcXWF1P5Q


I used a different template, mask and colours to the ones Rachel had used, I'm really happy with the end result, it's made me feel almost like a real artist!  I chose this quote as there are times when I wonder what happened to friends and people from my past.

I don't necessarily see it as a bad thing as I'm a firm believer in people pass through your life because they have something to give or teach you, or you have something that you need to give or teach them.  Some friends stay for a lifetime and others are there for such a short time.  Enjoy each and every friend for however long you have them.

Cheers,

Kasey


11 September 2013

Art Journal cover

Hello, I'm back again with another art journal cover.  I love playing around with this technique I learned at a class.  So decided to use the other stencil that came in the set of faces and made this lady silhouette. 

I'm pleased to introduce you to Serena...


I drew the 'hair' in and then used black gesso to paint the background then used some gorgeous purple glittery stemple paint to highlight the texture in the background.  A little fancy writing and the cover of my Art Journal was completed.

 I like the dreamy look she has, a kind of serene expression (hence the name) she's off exploring her dreams and you'll find them on the pages inside.

Cheers,

Kasey

02 September 2013

Hello everyone, here is something a little different.

Hi there, sorry to all my followers for being so slack lately.  I've had lots going on and not much time for crafting.  I'm now DT commitment free, it's a bit sad really as the people you meet when on Design Teams are fabulous and I'll miss all the banter in the private DT pages.  

Still I needed a break from things and a chance to recharge the crafting batteries as well as time to put towards family and work, it all gets a bit hectic at times!

So, I took time out to attend a class at my local scrapbooking store An Invitation to... on Saturday afternoon, look what I made, this fabulous Art Journal cover.  I Love her wistful violet eyes and that turbun style hair makes her a little Elizabeth Taylor...ish.

Here the art journal is open  so you can see all the flowing hair, I am yet to put the words on the front cover and my yet add some to the back as well.


Hope you like my little something different.

I'm working on a variation of this one as the mask for her face came with a profile image as well.  (Yes, I used a mask, I can't draw that well!)  When she's finished I'll show her.  

I'm also playing around with some smash booking and generally taking a break from card making.  I hope to get some scrap pages done as well.

Cheers,

Kasey ~ in Oz

21 August 2013

Hello everyone, my term with the Make it Crafty design team has come to its end.  I have made some amazing new friends, been able to play with some of the most beautiful digital images and had a lot of fun along the way.  I've learnt how to merge digital images and create backgrounds and improved my colouring skills.  I've had FUN.  Thank you to Zoe and the MiC DT for the absolutely fabulous time with them.  I'll still be around online and in the MiC facebook page occasionally, but I'm taking this opportunity to take a complete break from Design Team commitments.

 
My final project features some of MiCs slightly older images and they are super cute.  My grand daughter mispronounces a lot of words and I thought that if I don't capture them, then in a few years time when her language skills improve we will have forgotten most of them so I made some Smash book pages to capture it all.  I've also used some of the fabulous MiC chipboard that I have in my stash.  Love these chippies!

Using Frenchie Claudine, Frenchie Valerie and Frenchie Leon.


Frenchie Claudine
Copics used.  Skin: E000; 01; 11 R20.  Hair: C3; 5; 7; 9.  Clothes R14; 17; 29; 46;
B24; 26; 29; B0000; 00.  Icecream: R81; 83; 85. E30; 33; 35; E40; 43; R14; 17; 29; 46; YG00

 Frenchie Leon
Skin:  E000; 01; 11; 13; 31; 33.  Hair: E21; 25; 29.  Clothes YG91; 95; 99 Y23; 26; 28 Icecream
 E25; 29; 30; 33; 35; 37

 Frenchie Valerie
Skin: E50; 51; 53; 93 V22; 25.  Hair: E13; 15; 21; 33; 93.  Clothes: V22; 25; 28; Y17; 38.  Icecream: E30; 33; 35; Y00; 02; 11; E40; R14; 17; 27; 46

Hope this inspires you to get smashing using your MiC images, I've loved the pages I've created in both my smash book and my Art Journal.  Think about using your images in scrapbook pages and off the page projects too.

Cheers,
Kasey ~ in Oz

07 August 2013

The Red Queen

OMG This new Alice in Wonderland release from Make it Crafty is so amazing, I love it!

Here is my take on the beautiful Red Queen, she looks way too lovely to be the one saying off with her head. 

 I have added her to my home made smash book, and I really need to get better at the whole journaling thing!  I loved colouring her, I am sorry that she looks quite orangish here but she is definitely red. I've added lots of spica pen over the gold trim on her gown and red hearts on both that amazing collar and her dress trim.  Oh and the jewellery too.


It seems that my photography skills are still pretty lame, the gray shadow on her white doesn't show up too well.

Copic colours used.

Skin: E000, 01, 11  Eyes: G5
Hair: E21,25, 29
Dress: R59, 46, 27, 14; Y28, 26, 23; C03,02, 00

Hope you have a lovely crafty day!

Cheers,
Kasey ~ in Oz

02 August 2013

Back with a Bang! MiC new relase Alice In Wonderland!

Hey all, thank you for your patience while I had a month off from blogging, I've been able to concentrate on getting my health sorted and doing other things AND.......colouring for the Make it Crafty new release 
Alice in Wonderland!  I'm so inspired by these fabulous images so grab yourself a comfy seat, a cuppa and as this post is so long, you might need a snack as well!

~~~~~~~~~~~~~~~~~~~~~~~~~~~~~~~~~~~~~~~~~~~~~~~~~~~~~~~~

It’s time for the Make it Crafty to pour a round of drinks at the super special tea party celebrations!

Not only are we celebrating the magical release of Alice in Wonderland, but Make it Crafty has turned 3! All thanks to YOU, the incredible artists and the amazing Make it Crafty team!

Let’s dance around from chair to chair, sipping a drink, eating a cake, shrinking then growing with excitement as you watch the entertainment unfold before your eyes.

Be careful not to miss the hidden words as you’ll need to collect them along the way and string them all together to form a quote. Simply enter the quote at the end of the hop for a chance to win!

Hopefully you’ve found your way from Jenn, but if you’ve just skipped a chair or two you might want to start back at Zoe’s Blog.

 Here are my projects for you...


This is my little Alice and the Drink Me potion bottle, Alice is stuck in Wonderland with all these strange plants and colours all around her.  Below is a close up of her.  I had to go traditional with my colours, to me, Alice just isn't Alice if she's not blonde with a blue and white dress on.  But that's just my opinion.

Drink Me Bottle - BG000, BV000, 01, 02, 04 YR15, N1, R14, R46, E13, 15, 23, 31, 35, 37

Shrunken Alice - Skin: E000, 01, 11.  Hair: E50, 51, 53, 55. Dress: B21, 34, C2, 3.

 Next came the Mad Hatter's Tea Party images, I kept this page a little cleaner and just did a wash of colour in the background, there is a riot of colour on the Topsy Turvy Cake and the Mad Hatter so didn't want to overwhelm the whole page with too many other images.

For those of you MiC fans who are in the FB page, the Topsy Turvy Cake is the snippet that you had to guess, I think if someone had come up with a tea party answer they would have been close enough... Hope you had fun trying to guess.

The Mad hatter - Clothes: BV01, 02, 04, 08; R12, 14, 17, 46, 59; G02, 05; C3, 5, 9; YR15, 31; Skin: E000, 01, 11, 93; Hair: E13, 15, 19, YR18, 27 


Dormouse - W0, 01, 03, 05, 09; R14, 17, 46, 59; B21, 23, 26, 29; YR15, 31; E93, 95, 97; Y06, 08 000.

Topsy Turvy Cake - BV01, 02, 04, 08; R12, 14, 17, 46, 59; G02, 05; C3, 5, 9; Y000, 11, 15, 19

March Hare -  C2, 3, 5; E93, 95, 97; BV000, 01, 02, 04; Y15, 19; R46; G00, 02; E35, 37

Curious Alice - Hair: E50, 51, 53; Skin: E000, 00, 01, 11, 93; Clothes: B21, 34, C00, 03.


And for my last piece, I turned to my home made smash book and did a little scene with the Red Queen and her guards.  Hence the Off with Her Head title!


Queen of Hearts - E000, 01, 11; R14, 46, 59; C00, 02, 03; Y26

I used Curious Alice again this time flipping her around she is coloured in Copic markers as listed above.

Card Guard Back & Card Gurad Front - R14, 46, 59; C00, 02, 03; Y23; 26; 28; E13, 19, 23

The fun doesn’t stop here and if you head over to Aeryn's blog she’s going to treat you with some amazing projects.
 I really hope you grab yourself some of these amazing new images they were such fun to colour.
 Bye for now,
Kasey

01 July 2013

Back in Black

Yes, now you have ACDC's Back In Black as a song worm, it is appropriate for this post, there is a connection, I'll show you what I made today.

I've created a black mixed media canvas today, lots of layers and lots of black.  I was a bit doubtful as to how this would turn out but as I was creating it, I decided that it would be perfect for a black and white photo from my daughters wedding earlier this year.  Shayne and Becca are both huge ACDC fans and so there is the connection.

Becca was talking about her 'rogues gallery' collection of pictures that she wanted to group on her wall, she's painted all her frames black and this would fit perfectly with them.  I printed out a wedding photo of the happy couple on the beach in black and white onto copic blending card then using a foam roller I added matt modge podge over the top. 

Here is a closeup of the canvas, I just love how it turned out and so does the bride.
I've spritzed the frame with some shimmer paint to add a tiny bit of sparkle, all it needs now is a quick coat of matt spray to seal the gesso and make it easier to dust!


Hope you like what I've been playing around with in the last few days.

Cheers,
Kasey

30 June 2013

Collage frame

Hi all, I was visiting one of my favourite scrapbook shops yesterday and spied this technique, so asked for a quick rundown on it as the next class would be ages away, I went home and created this beautiful collage.

Layer upon layer of chipboard, buttons, beads, embellishments, lace, flowers, charms, letters, cord, pearls, shells, metal bits and bobs. Lots of gesso and I used matt modge podge to glue everything down

It does look awesome in white, however I've used this awesome multicoloured spray. Lindy's stamp gang Sweet Violet Purple Teal, it has the most beautiful shimmer and from the one bottle, this is how the paint dries.  This has two layers of spray on it, it has a few touch up spritzes as well.  Just waiting now for a photo!


Thanks for stopping in to say hello, hope you like my latest creation.  I'm going to do one in black now, not sure how it will go but thought I'd give it a shot.

Cheers,
Kasey

27 June 2013

Southern Girls challenge

Hello friends, sadly this is my last Southern Girls DT assignment, I have asked the lovely Tracey and Louise if I can step down from the design team (for now, who knows what the future may bring), I have a lot going on right now.  

I'd like to thank Tracy and Louise they have been the most wonderful and understanding 'bosses' and I count them both as friends.  The entire SGC design team are awesome, supportive and talented and I will continue to keep track of their amazing art as they always provide me with inspiration.  OK enough of the soppy stuff before my eyes start leaking!

For my inspiration card, I've used an image from one of my favourite stamp companies, Delicious Doodles Butterfly Border.  I printed this out and coloured it twice using Copic BGs and Bs and a little bit of spica glitter, the flowers were done in BVs. I then fussy cut the butterflies and flowers to layer on top of the other image. 

The gorgeous leaves from Flourishes with a Bling was snipped to create this lovely vine for the butterflies.
 Here are a few shots from angles so you can see the layers.  I think these colours are gorgeous, if you're a regular visitor to my blog you'll know I seem to gravitate towards them!


Thank you SGC!  Mwahhh

Cheers,
Kasey ~ in Oz

21 June 2013

Fairies and more at Make it Crafty

Hello MiC fans, I'm here with a journal page made using three of the fabulous fairies from MiC.  Did you see that Zoe has just released a sensational new range of mystical images, some amazing backgrounds and some awesomely cute gnomes and delicious fairies.  Check them out here.

Now onto the journal page, I've used three darling fairies and a poem from Yeats.  I've used all my favourite colours in this page, lots of lovely pinks, purples and teals.


 Close up pics of these gorgeous fairies.


The fairies are coloured with copic markers and then fussy cut and placed on the journal pages.  This just shows how versatile digital images are, the images have been flipped and printed out larger than I would for a card so the three images fit on the A4 size journal.

My apologies, I haven't listed the colours used this time round.  I forgot to write them down!

I've used Elven Ardella, Elven Samenah, Fairy Dahlia
Hope you find some more fun and creative ways of using digital images!  And again, don't forget to check out the new release!

Cheers,
Kasey ~ in Oz