Followers

Showing posts with label Copics. Show all posts

08 October 2014

Huntress

 A really beautiful elven Huntress this one from Norma J Burnell. Love how she turned out.  I tried for a softer look on her clothes but kept her wrist bands and weapon in leather colours, really happy with the tones in her hair.


I need to put her into my art journal soon just thinking about a border around her in tangels.

Thanks for stopping by.

Cheers,

Kasey

07 October 2014

Fairy Dragon Queen

Another of Norma J Burnell's amazing tangled fairies this time with a gorgeous baby dragon!  I love doing these using rich colours, I'll have to try doing a pastel one soon.  I took the liberty of drawing some smaller scales on the baby dragon with a mulitliner as it looked a little strange to me that the legs didn't have scales.  Hope that isn't a problem.  

I'm a little disappointed in the liquid pearls used on her dress, the larger ones stayed in peaks rather than rounding off a little, possibly my lack of technique in applying them!


Hope you like her, I've got a huntress coming up next.  Just love colouring these gorgeous images, I print them off on A4 copic blending card and am putting them in an art journal along with other copic work like mandalas and other digi stamps.  

Cheers,

Kasey

14 September 2014

Dreamer

This is another beautiful image from Norma J Burnell, stunning Tangle Fairies.  This one is called Dreamer and she does have some butterflies surrounding her on the original image, I wanted to put her into an art journal page so needed to trim around her.


The background is acrylic paint with champagne metallic rub around the edges and on the dragonflies.  The stunning Dreamer image is coloured with copics, I kept to plum, mustard, blue and gold with a tiny touch of green on some leaves.  I felt that such an intricate design required minimal colours to allow the Norma's digi art to show through more. 

While Zentangle (trademarked) or the other variety of this more loosely called Tangles is an art form that anyone can do, combining them with such amazing drawing talent the way Norma does is so much more unique.  I'm certainly in awe and so grateful that I can purchase her digi's to colour.  She has inspired me to open my copic markers again and for that I am grateful too.

Until next time.

Cheers,
Kasey-in-Oz

06 September 2014

Is it really 6 months?

Wow, I can't believe that it's been 6 months since my last post here.  That's amazing how quickly the time passes by.

I've been crafting and I have posted a few things on my facebook page Paisley Wings, but not done much here.  I think I should remedy that!

I've moved my studio around and have now taken over the family room, it's fabulous!  Open, lots of room to move around a central creating space with a bench backing my desk, PC beside the desk so I can check out you tube tutorials and learn and try new techniques.  Lots of open shelving storage that kinda needs a little more TLC so no pics at the moment.

In the move, I got inspired to crack open some copic markers which have been sadly neglected while I've been playing around with art journals, acrylic paints, Dylusions and Lindy's stamp gang sprays, stencils, lumiers, stemple paint, stamps, papers, embossing, die cuts oh the list goes on.  So many things to play with and never enough time!

One of the things I've been promising myself was to get my hands on some of Norma J Burnell's amazing art work.  Her Fairy Tangles are amazing.  Here is one I completed.  the photo doesn't show the shimmer on the dragonfly wings so they look unfinished here, but trust me they are so shimmery. 

I think I need some more practice as it's been ages since I've played with the copics.  Gee that's gonna be hard......LOL
.


21 August 2013

Hello everyone, my term with the Make it Crafty design team has come to its end.  I have made some amazing new friends, been able to play with some of the most beautiful digital images and had a lot of fun along the way.  I've learnt how to merge digital images and create backgrounds and improved my colouring skills.  I've had FUN.  Thank you to Zoe and the MiC DT for the absolutely fabulous time with them.  I'll still be around online and in the MiC facebook page occasionally, but I'm taking this opportunity to take a complete break from Design Team commitments.

 
My final project features some of MiCs slightly older images and they are super cute.  My grand daughter mispronounces a lot of words and I thought that if I don't capture them, then in a few years time when her language skills improve we will have forgotten most of them so I made some Smash book pages to capture it all.  I've also used some of the fabulous MiC chipboard that I have in my stash.  Love these chippies!

Using Frenchie Claudine, Frenchie Valerie and Frenchie Leon.


Frenchie Claudine
Copics used.  Skin: E000; 01; 11 R20.  Hair: C3; 5; 7; 9.  Clothes R14; 17; 29; 46;
B24; 26; 29; B0000; 00.  Icecream: R81; 83; 85. E30; 33; 35; E40; 43; R14; 17; 29; 46; YG00

 Frenchie Leon
Skin:  E000; 01; 11; 13; 31; 33.  Hair: E21; 25; 29.  Clothes YG91; 95; 99 Y23; 26; 28 Icecream
 E25; 29; 30; 33; 35; 37

 Frenchie Valerie
Skin: E50; 51; 53; 93 V22; 25.  Hair: E13; 15; 21; 33; 93.  Clothes: V22; 25; 28; Y17; 38.  Icecream: E30; 33; 35; Y00; 02; 11; E40; R14; 17; 27; 46

Hope this inspires you to get smashing using your MiC images, I've loved the pages I've created in both my smash book and my Art Journal.  Think about using your images in scrapbook pages and off the page projects too.

Cheers,
Kasey ~ in Oz

07 August 2013

The Red Queen

OMG This new Alice in Wonderland release from Make it Crafty is so amazing, I love it!

Here is my take on the beautiful Red Queen, she looks way too lovely to be the one saying off with her head. 

 I have added her to my home made smash book, and I really need to get better at the whole journaling thing!  I loved colouring her, I am sorry that she looks quite orangish here but she is definitely red. I've added lots of spica pen over the gold trim on her gown and red hearts on both that amazing collar and her dress trim.  Oh and the jewellery too.


It seems that my photography skills are still pretty lame, the gray shadow on her white doesn't show up too well.

Copic colours used.

Skin: E000, 01, 11  Eyes: G5
Hair: E21,25, 29
Dress: R59, 46, 27, 14; Y28, 26, 23; C03,02, 00

Hope you have a lovely crafty day!

Cheers,
Kasey ~ in Oz

02 August 2013

Back with a Bang! MiC new relase Alice In Wonderland!

Hey all, thank you for your patience while I had a month off from blogging, I've been able to concentrate on getting my health sorted and doing other things AND.......colouring for the Make it Crafty new release 
Alice in Wonderland!  I'm so inspired by these fabulous images so grab yourself a comfy seat, a cuppa and as this post is so long, you might need a snack as well!

~~~~~~~~~~~~~~~~~~~~~~~~~~~~~~~~~~~~~~~~~~~~~~~~~~~~~~~~

It’s time for the Make it Crafty to pour a round of drinks at the super special tea party celebrations!

Not only are we celebrating the magical release of Alice in Wonderland, but Make it Crafty has turned 3! All thanks to YOU, the incredible artists and the amazing Make it Crafty team!

Let’s dance around from chair to chair, sipping a drink, eating a cake, shrinking then growing with excitement as you watch the entertainment unfold before your eyes.

Be careful not to miss the hidden words as you’ll need to collect them along the way and string them all together to form a quote. Simply enter the quote at the end of the hop for a chance to win!

Hopefully you’ve found your way from Jenn, but if you’ve just skipped a chair or two you might want to start back at Zoe’s Blog.

 Here are my projects for you...


This is my little Alice and the Drink Me potion bottle, Alice is stuck in Wonderland with all these strange plants and colours all around her.  Below is a close up of her.  I had to go traditional with my colours, to me, Alice just isn't Alice if she's not blonde with a blue and white dress on.  But that's just my opinion.

Drink Me Bottle - BG000, BV000, 01, 02, 04 YR15, N1, R14, R46, E13, 15, 23, 31, 35, 37

Shrunken Alice - Skin: E000, 01, 11.  Hair: E50, 51, 53, 55. Dress: B21, 34, C2, 3.

 Next came the Mad Hatter's Tea Party images, I kept this page a little cleaner and just did a wash of colour in the background, there is a riot of colour on the Topsy Turvy Cake and the Mad Hatter so didn't want to overwhelm the whole page with too many other images.

For those of you MiC fans who are in the FB page, the Topsy Turvy Cake is the snippet that you had to guess, I think if someone had come up with a tea party answer they would have been close enough... Hope you had fun trying to guess.

The Mad hatter - Clothes: BV01, 02, 04, 08; R12, 14, 17, 46, 59; G02, 05; C3, 5, 9; YR15, 31; Skin: E000, 01, 11, 93; Hair: E13, 15, 19, YR18, 27 


Dormouse - W0, 01, 03, 05, 09; R14, 17, 46, 59; B21, 23, 26, 29; YR15, 31; E93, 95, 97; Y06, 08 000.

Topsy Turvy Cake - BV01, 02, 04, 08; R12, 14, 17, 46, 59; G02, 05; C3, 5, 9; Y000, 11, 15, 19

March Hare -  C2, 3, 5; E93, 95, 97; BV000, 01, 02, 04; Y15, 19; R46; G00, 02; E35, 37

Curious Alice - Hair: E50, 51, 53; Skin: E000, 00, 01, 11, 93; Clothes: B21, 34, C00, 03.


And for my last piece, I turned to my home made smash book and did a little scene with the Red Queen and her guards.  Hence the Off with Her Head title!


Queen of Hearts - E000, 01, 11; R14, 46, 59; C00, 02, 03; Y26

I used Curious Alice again this time flipping her around she is coloured in Copic markers as listed above.

Card Guard Back & Card Gurad Front - R14, 46, 59; C00, 02, 03; Y23; 26; 28; E13, 19, 23

The fun doesn’t stop here and if you head over to Aeryn's blog she’s going to treat you with some amazing projects.
 I really hope you grab yourself some of these amazing new images they were such fun to colour.
 Bye for now,
Kasey

27 June 2013

Southern Girls challenge

Hello friends, sadly this is my last Southern Girls DT assignment, I have asked the lovely Tracey and Louise if I can step down from the design team (for now, who knows what the future may bring), I have a lot going on right now.  

I'd like to thank Tracy and Louise they have been the most wonderful and understanding 'bosses' and I count them both as friends.  The entire SGC design team are awesome, supportive and talented and I will continue to keep track of their amazing art as they always provide me with inspiration.  OK enough of the soppy stuff before my eyes start leaking!

For my inspiration card, I've used an image from one of my favourite stamp companies, Delicious Doodles Butterfly Border.  I printed this out and coloured it twice using Copic BGs and Bs and a little bit of spica glitter, the flowers were done in BVs. I then fussy cut the butterflies and flowers to layer on top of the other image. 

The gorgeous leaves from Flourishes with a Bling was snipped to create this lovely vine for the butterflies.
 Here are a few shots from angles so you can see the layers.  I think these colours are gorgeous, if you're a regular visitor to my blog you'll know I seem to gravitate towards them!


Thank you SGC!  Mwahhh

Cheers,
Kasey ~ in Oz

30 May 2013

Bingo! @ Southern Girls

Hello, yes I am still around, I've been challenging myself to try something new for me but shhh it's not ready for sharing just yet.  

What I do have for you is the Southern Girls latest challenge 'bingo card'.
 I am stretching is just a little with my 'gems' I'm using the flower centres as my gems.  The spots are included in the background paper that comes with this amazing image from The Paper Shelter called the Dragon Whisperer.  I just love the little dragon.
 I've used lots of distressing and distress ink to give that aged look.  Hope you're inspired by the choices in our bingo card.  Love to see you playing along.


 Cheers,

Kasey ~ in Oz


18 May 2013


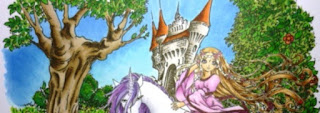
 Hello everyone, sorry I've been a bit missing in action lately, but I'm back with a post for you that I hope inspires you to try merging images if you haven't already tried it.  I've created this picture on one sheet of A4 Make it Colour Blending card (fabulous stuff!)

This was my very first attempt at merging images using Paint Net.  I know I've shown a few of my merged pieces since then, but I thought I'd show you this one to show that while it is far from perfect, it's still pretty good for a first attempt and I've found as I have practiced and gained experience then you can too! 

 I used Far Away Castle; Enchanted Unicorn and Exquisite Princess
Let me tell you it was at first quite daunting, this was the first time I'd tried merging images and then of course there was all that colouring ahead of me.  What I did though was work on it in sections, that broke the whole project down into more manageable pieces.

Check out the tutorial section here and also ask questions in the MIC facebook page for advice from the DT, Youtube also has some amazing tutorials.  All you need to do is try and you too can create beautiful pictures and artwork using MiC digi stamps and colouring them with your favourite media weather that be Copic or other alcohol markers, distress inks or pencils.

Cheers,
Kasey ~ in Oz

19 April 2013

It's SHOWTIME!


Let us Entertain You!!
It's SHOWTIME at Make it Crafty!


We're a tapping our heels together with a tap a tap tap,
Clanging the symbols and beating the drums with a bang a bang bang,
Pulling rabbits from hats and lifting our legs - oooooohhh ahhhhhhh,
Singing our hearts out and jamming to the beat -  doo do do daaaaa...


It's time to be entertained at Make it Crafty with the
new Entertainers Collection of digi and rubber stamps!

You'll find all the new digital stamps here and you can now pre-order the rubber stamps here!


You can't have a GRAND SHOW without a DOORPRIZE!
Hop on through to be inspired and leave comments along the way for your chance to
win hidden prizes and be in the draw to win one of the grand door prizes!

One person will win the full collection of digi stamps
and another will win the full collection of rubber stamps!

ENJOY THE SHOW!!


Hop List
Jenny - Special Guest - http://jenniferds.blogspot.com.au/
Kay - Special Guest - http://kaym74.blogspot.com.au/
Stephanie - http://mycardshack.blogspot.com

Wow, you will be literally blown away by this release.  The images in this collection are so AWESOME.   I certainly was and loved so many of them that I created several projects.  So grab yourself a comfy seat and a cuppa and settle in for a fabulous show.

Meet the Paper, Rock, Scissors Band!  These guys really rock.   I have to say that my background was three different things before it became a backdrop of all C9!  Yes I had to order a refill, next time I think I'll just use black card and fussy cut them all out!  LOL at least I had fun with it. 

 The lead guitar and lead singer are both fussy cut and mounted on foam squares to give a 3d effect.

Let me introduce you to the Paper, Rock, Scissors band.....


On the drums we have  Drummer Dude


I realised too late that his belly was showing, after I'd coloured it blue!  Sigh


Our super cool base player Rocker Chick ads some rockin back beat to our sweet music. 


I added the spot on her singlet with a sparkle of pink an gave her John Lennon blue glasses, perhaps they need to be a little darker, I also put some glossy accents on her guitar to make it shine.


Slammin' it out on lead guitar is Rocker Dude


 His guitar has also had a glossy coating so it shines.


This groovy Rockstar Singer makes up the Paper, Rock Scissors band and what an amazing line up it is.


These guys and gals are awesome, head on over to the Make it Crafty store and grab them so they can rock your world!
  
 Copics used for the Band

B91; 93; 95; 97; 99
R14; 17; 43; 46; 56; 59
BG72; 75; 78
B0000, 00; 04

E000; 00; 01; 11; 13; 15; 19; 21; 25; 29; 31; 35; 37; 40; 50; 51; 53; 93
YR000; 01; 02; 04
RV14; 17; 19
V0000; 000; 01; 04
C1; 2; 3; 5; 7; 9
Y26; 28
0; 100; T2


My next act is a far cry from a rockin' band, it's a Night at the Opera!  with these amazing characters. 


 I've actually altered the Grand Opera Theatre for this piece there are private boxes on the walls either side of this amazing stage.   You really have to see it to believe how awesome this collection really is.  

I flipped the male singer around so the singers were facing each other rather than soap opera style with his back to her.


Copics used for the Grand Opera 
Y26; 28; R14; 17; 22; 27; 35; 46; 59; E000; 00; 01; 04; 11; 21; 25; 29; 37; 39; 35; 81; 93; 99; B00;W0; 01; T2; C2; 5; 7

And now for the finale, here is something just a little bit saucy!  One of the fabulous things that Zoe is doing is releasing some of the images in rubber!  How exciting is that?  


Here is one of the amazing Can Can Dancers, I just love the sentiment! I decided to make another smashbook page, I seem to be creating a lot of them lately.   I created her with greyish hair because to me that made the sentiment mean so much more!


I used some frosted lace stickles on her petticoat.  Love how it sparkles.  I apologise for the photos, they aren't as clear as they could be. 

Colours used R56 and 59 on the petticoat, R81, 83 and 85 for the dress and feather.  C3; 5; 9 for her hair and boots and E000, 00, 01, 11 for her skin.

Well congratulations on making it this far.  Thank you for taking the time to get this far, it was a very long post full of entertainment for you. 

Don't forget the door prize, you could win the entire Entertainers collection!  so leave comments on all the stops along the way!

Cheers,

Kasey