Followers

Showing posts with label Make it Crafty. Show all posts

21 August 2013

Hello everyone, my term with the Make it Crafty design team has come to its end.  I have made some amazing new friends, been able to play with some of the most beautiful digital images and had a lot of fun along the way.  I've learnt how to merge digital images and create backgrounds and improved my colouring skills.  I've had FUN.  Thank you to Zoe and the MiC DT for the absolutely fabulous time with them.  I'll still be around online and in the MiC facebook page occasionally, but I'm taking this opportunity to take a complete break from Design Team commitments.

 
My final project features some of MiCs slightly older images and they are super cute.  My grand daughter mispronounces a lot of words and I thought that if I don't capture them, then in a few years time when her language skills improve we will have forgotten most of them so I made some Smash book pages to capture it all.  I've also used some of the fabulous MiC chipboard that I have in my stash.  Love these chippies!

Using Frenchie Claudine, Frenchie Valerie and Frenchie Leon.


Frenchie Claudine
Copics used.  Skin: E000; 01; 11 R20.  Hair: C3; 5; 7; 9.  Clothes R14; 17; 29; 46;
B24; 26; 29; B0000; 00.  Icecream: R81; 83; 85. E30; 33; 35; E40; 43; R14; 17; 29; 46; YG00

 Frenchie Leon
Skin:  E000; 01; 11; 13; 31; 33.  Hair: E21; 25; 29.  Clothes YG91; 95; 99 Y23; 26; 28 Icecream
 E25; 29; 30; 33; 35; 37

 Frenchie Valerie
Skin: E50; 51; 53; 93 V22; 25.  Hair: E13; 15; 21; 33; 93.  Clothes: V22; 25; 28; Y17; 38.  Icecream: E30; 33; 35; Y00; 02; 11; E40; R14; 17; 27; 46

Hope this inspires you to get smashing using your MiC images, I've loved the pages I've created in both my smash book and my Art Journal.  Think about using your images in scrapbook pages and off the page projects too.

Cheers,
Kasey ~ in Oz

07 August 2013

The Red Queen

OMG This new Alice in Wonderland release from Make it Crafty is so amazing, I love it!

Here is my take on the beautiful Red Queen, she looks way too lovely to be the one saying off with her head. 

 I have added her to my home made smash book, and I really need to get better at the whole journaling thing!  I loved colouring her, I am sorry that she looks quite orangish here but she is definitely red. I've added lots of spica pen over the gold trim on her gown and red hearts on both that amazing collar and her dress trim.  Oh and the jewellery too.


It seems that my photography skills are still pretty lame, the gray shadow on her white doesn't show up too well.

Copic colours used.

Skin: E000, 01, 11  Eyes: G5
Hair: E21,25, 29
Dress: R59, 46, 27, 14; Y28, 26, 23; C03,02, 00

Hope you have a lovely crafty day!

Cheers,
Kasey ~ in Oz

02 August 2013

Back with a Bang! MiC new relase Alice In Wonderland!

Hey all, thank you for your patience while I had a month off from blogging, I've been able to concentrate on getting my health sorted and doing other things AND.......colouring for the Make it Crafty new release 
Alice in Wonderland!  I'm so inspired by these fabulous images so grab yourself a comfy seat, a cuppa and as this post is so long, you might need a snack as well!

~~~~~~~~~~~~~~~~~~~~~~~~~~~~~~~~~~~~~~~~~~~~~~~~~~~~~~~~

It’s time for the Make it Crafty to pour a round of drinks at the super special tea party celebrations!

Not only are we celebrating the magical release of Alice in Wonderland, but Make it Crafty has turned 3! All thanks to YOU, the incredible artists and the amazing Make it Crafty team!

Let’s dance around from chair to chair, sipping a drink, eating a cake, shrinking then growing with excitement as you watch the entertainment unfold before your eyes.

Be careful not to miss the hidden words as you’ll need to collect them along the way and string them all together to form a quote. Simply enter the quote at the end of the hop for a chance to win!

Hopefully you’ve found your way from Jenn, but if you’ve just skipped a chair or two you might want to start back at Zoe’s Blog.

 Here are my projects for you...


This is my little Alice and the Drink Me potion bottle, Alice is stuck in Wonderland with all these strange plants and colours all around her.  Below is a close up of her.  I had to go traditional with my colours, to me, Alice just isn't Alice if she's not blonde with a blue and white dress on.  But that's just my opinion.

Drink Me Bottle - BG000, BV000, 01, 02, 04 YR15, N1, R14, R46, E13, 15, 23, 31, 35, 37

Shrunken Alice - Skin: E000, 01, 11.  Hair: E50, 51, 53, 55. Dress: B21, 34, C2, 3.

 Next came the Mad Hatter's Tea Party images, I kept this page a little cleaner and just did a wash of colour in the background, there is a riot of colour on the Topsy Turvy Cake and the Mad Hatter so didn't want to overwhelm the whole page with too many other images.

For those of you MiC fans who are in the FB page, the Topsy Turvy Cake is the snippet that you had to guess, I think if someone had come up with a tea party answer they would have been close enough... Hope you had fun trying to guess.

The Mad hatter - Clothes: BV01, 02, 04, 08; R12, 14, 17, 46, 59; G02, 05; C3, 5, 9; YR15, 31; Skin: E000, 01, 11, 93; Hair: E13, 15, 19, YR18, 27 


Dormouse - W0, 01, 03, 05, 09; R14, 17, 46, 59; B21, 23, 26, 29; YR15, 31; E93, 95, 97; Y06, 08 000.

Topsy Turvy Cake - BV01, 02, 04, 08; R12, 14, 17, 46, 59; G02, 05; C3, 5, 9; Y000, 11, 15, 19

March Hare -  C2, 3, 5; E93, 95, 97; BV000, 01, 02, 04; Y15, 19; R46; G00, 02; E35, 37

Curious Alice - Hair: E50, 51, 53; Skin: E000, 00, 01, 11, 93; Clothes: B21, 34, C00, 03.


And for my last piece, I turned to my home made smash book and did a little scene with the Red Queen and her guards.  Hence the Off with Her Head title!


Queen of Hearts - E000, 01, 11; R14, 46, 59; C00, 02, 03; Y26

I used Curious Alice again this time flipping her around she is coloured in Copic markers as listed above.

Card Guard Back & Card Gurad Front - R14, 46, 59; C00, 02, 03; Y23; 26; 28; E13, 19, 23

The fun doesn’t stop here and if you head over to Aeryn's blog she’s going to treat you with some amazing projects.
 I really hope you grab yourself some of these amazing new images they were such fun to colour.
 Bye for now,
Kasey

21 June 2013

Fairies and more at Make it Crafty

Hello MiC fans, I'm here with a journal page made using three of the fabulous fairies from MiC.  Did you see that Zoe has just released a sensational new range of mystical images, some amazing backgrounds and some awesomely cute gnomes and delicious fairies.  Check them out here.

Now onto the journal page, I've used three darling fairies and a poem from Yeats.  I've used all my favourite colours in this page, lots of lovely pinks, purples and teals.


 Close up pics of these gorgeous fairies.


The fairies are coloured with copic markers and then fussy cut and placed on the journal pages.  This just shows how versatile digital images are, the images have been flipped and printed out larger than I would for a card so the three images fit on the A4 size journal.

My apologies, I haven't listed the colours used this time round.  I forgot to write them down!

I've used Elven Ardella, Elven Samenah, Fairy Dahlia
Hope you find some more fun and creative ways of using digital images!  And again, don't forget to check out the new release!

Cheers,
Kasey ~ in Oz

21 April 2013

Butterfly Trinket Box

Oh my, have you seen these boxes?  Aren't they amazing? 
These gorgeous Butterfly Trinket Boxes are available for a limited time only from Make It Crafty
.


 I've painted the decorative sides and lid in gold metallic paint and the actual box sides and base were painted flat black outside.

 Of course, no project is really complete without adding bling!

 After the gold paint was dry, I gave the lid a couple of coats of UTEE (Ultra Thick Embossing Powder) This has sealed the lid with a high shiny coat.  The black border and gold painted Ornate Corners chipboard corners were added later.


I got some sticky backed felt and lined the inside of the box, I think I might have forgotten to paint the edge black!  LOL Don't you just love noticing things like that when you go to post the pictures!

Here are the details on this adorable little box

Size once assembled: (all sizes are estimates)
Approximately 10cm (4")
Height: 50mm (2")
What you receive:
  1. All pieces come pre-cut for you to assemble
  2. Step by Step photo instructions
What you will need:
  1. Wood Glue
  2. Undercoat Paint Sealer
Cheers

Kasey

11 April 2013

Product Spotlight - Make it Crafty mini printers tray.

Hello there, I'm here today to show you one of these fabulous little printer’s trays that Zoe has made. They come in a kit and you just glue them together and decorate.  Easy Peasy!

I gave my Circle Feature Printers Tray a couple of coats of off white acrylic paint, I used Jo Sonia as it is quite thick and covers well.  I had picked up a Graphic 45 paper stack on sale called Once Upon a Springtime, it’s lovely old fashioned fairies.  I also got this fabulous silver fairy charm so I built my tray around these things.
 I’ve used MiC Heart Flourishes chipboard and embossed it with silver to match in with the charm, I love how delicate Zoe’s chipboard is.

 I’ve also used up a lot of my tiny flowers, rosebuds and little roses, pearls and chipboard butterflies as well, I loved using all of these tiny embellishments to create this gorgeous little decorative piece.
 

 The butterflies are from two different sets, Butterflies and Leaves and Mini Butterflies, both painted with metallic paints.

I hope you’ll give one of these gorgeous little printer’s trays a try, they are such fun to decorate, they come with two options for display, a stand or a hanging attachment for the back.  They measure up at approximately  Width 120mm (4.75″)   Height: 165mm (6.5″)  Depth: 12mm once assembled.

Cheers,

Kasey ~ in Oz


25 March 2013

Groovy Chick layers for Make it Crafty

Our inspiration theme at Make it Crafty this week is Lots of Layers, now I love layering my patterned papers and I usually go for either Vintage/Shabby Chic or CAS, I'm not sure this fits in to either of those categories as Holly-Rose is kinda Retro so that's what I did, lots of layers and what's more retro than powder blue?


The image is definitely minimalist in the colouring, clothes are three colours used and hair is two!  I wanted something very fresh and light.  For her clothes B0000 and B00 with a wash of 0 just to fade it all out a little.  The trim is Y38 with Gold spica over the top, her shoes are also gold spica pen.

Her hair is just E40 and E42 that's it! Oh and some white space at the lightest parts.  Skin tones are my go to colours that I use mostly, E000, E01. E11 and R20.  I've coloured Holly-Rose on Make it Colour Blending Card


I had this paper stack from Me and My Big Ideas and it was a perfect match right down to sparkly embossed flowers, so a little bit of fussy cutting and I had my embellishments.  So all up there are more than 10 layers in my project, I think that fits the bill!

Hope you have fun playing around with your layers.

Cheers,

Kasey ~ in Oz

16 March 2013

Joint blog hop Make it Crafty and Tiddly Inks go Egyptian

Hello everyone, Welcome to day two of the joint release of Egyptian Themed images from Make it Crafty and Tiddly Inks.

If you want to join in on the fun.....Head here to day one to start your Archeological dig for the clues, there are some great prizes to be won.

My inspiration project is using the MiC Hieroglyphic Wall merged with Cleo Walk the Walk from TI to make this page in my journal.

 I've used lots of gold strips to form frames around the image and edging the outside of my frame.  I've also used some of Zoe's gorgeous chipboard corners painted gold, I had a little accident with the gold leaf pen and ended up with a squiggle on the black page from my fingernail.....Noooooo.  Well a mistake is always a creative opportunity so I used the same nail and added more squiggles all around as another border.  Sort of gives a marbled effect.


Here's a close up of Cleo walking her walk!  No Queen of the Nile can go without her adornment so I've added lots of bling!
Copics used
Skin: E0000, 000, 01, 11
Hair: C5, 7, 9
Background:  E40, 41, 42, 43, 44 Gold and clear spica pens, B00
Dress and Circlet:  Y26, 28, gold, clear and lipstick spica pens

Don't forget that aside from the clue finding, if you want to snag yourself some of these fabulous images both stores are having a sale!


Cheers,
Kasey ~ in Oz

25 February 2013

Butterflies and Bling at Make it Crafty

Hi there everyone, this is really exciting to have my first inspiration post for Make it Crafty.  I've posted in two blog hops so far but this is the first time being featured on the store blog!  It's sooo cool.  I've used Crystal Digi stamp and done her up in fresh and light colours.


  The Butterflies have been painted with a shimmery white then I went over them with a lilac mica spray to give the slight hint of colour and of course all the bling.

(sorry, blogger is not cooperating on this second pic)
 

Make it Crafty products used

Copic colours used
Skin:  E0000, E00, E01 & E11
Hair: E21, E50, E51, E53 & E33
Dress and Shoes: B60, B63 B66, BV0000, Y000, Y11 & Y15
Rose: YG63, YG67, RV52 & RV55
Background: B0000, B00, V000, V01 & 0

Thanks for stopping by.

Cheers,
Kasey

22 February 2013

Make it Crafty ~ Gift for a friend blog hop

Hi everyone, I'm really excited to be taking part in this Make it Crafty blog hop!  We have some amazing projects to show you today, I'm so honoured to be working along side these awesomely talented ladies.

Today's post is really exciting for me, I've had a play with the fabulous Make it Crafty 3D Chipboard kit using Shadow Box Square Frame Kit.  It was awesome to put together, the finish is so neat and perfectly aligned.  I also have used the Antique Flourish chipboard set, I love the flourishes and the heart is just stunning.


If you visit my blog regularly, you would have seen that my daughter recently got married, her niece was flower girl and I just LOVED this photo of her collecting shells on the beach when the bridal party went to have some photos taken.


 I put the frame together, leaving the stand until last, gave it a coat of metallic gray acrylic paint.  The chipboard was painted with Platinum paint and the photo was printed and mounted on a mat of Gray card with a fine shimmer and then on the blue metallic paper that I'd used on the wedding invitations.


 Some closeup shots of the embellishments, a little cluster of roses, some blue rhinestones and strings of pearls.
 The heart is so delicate and gorgeous, I really love how elegant all this gorgeous chipboard is.

 This picture is taken on the angle to show you the depth of the shadowbox frame.  I hope you're inspired to try one of these amazing kits yourself.

Next in the line is....Ã…sa

And in case you need it, here is the list of DT Lovelies who are participating in this bloghop


Kasey - You are here


I just know you're going to enjoy this bloghop!

Thanks for leaving your lovely comments, they are very much appreciated.

Cheers,
Kasey ~ in Oz

10 February 2013

Mysterious Valentine

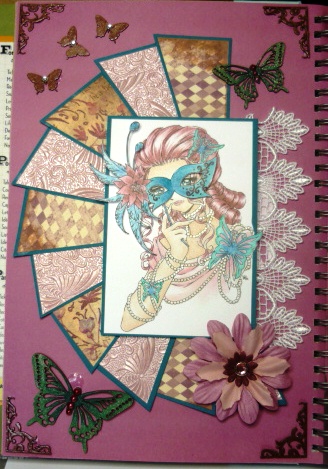
Hi everyone, I've got a little smash book page to show you today.  I've picked up some Prismacolour pencils and here what I came up with in my first play with them.  I used Ruby, a fabulous Make it Crafty image from the new masquerade range.  

Ruby comes with two different masks and you can use a program like paint.net or photoshop to put her mask on or like me you print it out and pop it up on top.  I cut tiny little holes to put the stem of the mask in her hand.


 This is the full page, I had this idea going round my head to make a fan, I have images from the movies of masquerade balls with gorgeous dresses, lace fans and glittering masks.  I used some textured pink butterfly paper that I've had for an age as it fit the theme perfectly.

The chipboard here is from Make it Crafty I love how delicate Zoe makes her chippies.  Gorgeous to work with and perfect for cards.  Here I've coloured the butterfly with BG13 and BG57 then coated it with clear spica pen, it's gone a very different colour with the spica over the top, it seems to have added more yellow.  still they do look so pretty.

The corners are painted with nail polish!  two coats of colour and one of clear to bring  out the shine just like you would paint your nails!  

I'm entering Ruby into the following challenges.

Our Creative Corner - Picture inspiration - Mask
Make it Monday - Anything Goes
Flutter By Wednesday - Anything Goes (butterfly or fairy)
In the Pink - Pink Valentine  (Valentine's are usually a mystery hence the mask)

Thanks for stopping by, it feels really good to be back creating for challenges again!

Cheers,
Kasey ~ in Oz

11 January 2013

Oh so exciting!

Well the call went out and I ummed and ahed for ages then sent an email in to the lovely Zoe and took a chance at applying for a spot on her Design Team for Make it Crafty.

Well I nearly fell off my chair when Zoe emailed me to say I'd been selected.  I'm thrilled to be joining the talented girls in her team.  I am sure that there were very many talented artists who applied and it would have been a very difficult choice. 

Please visit the Make it Crafty store blog to see a list of all the Design Team.

The MiC Design Team participating in the New Beginnings blog hop are
 
Kasey (you are here)

As the inspiration we are providing you with this week is New Beginnings, I selected Little Baby Fairy and this is what I came up with

A lovely new baby card, I kept it fairly simple as I wanted the image to shine, but of course I couldn't help but add a little bit of bling in the form of glittered up Ornate Swirls chipboard pieces.  I coloured them with G43 first, then coated the swirls with Crystal Lacquer and then sprinkled some light and mid green glitters on the wet glue and left it aside to dry before adding it to the card front.  I also coloured some clear rhinestones with G99, I've found gems need a darker copic ink to give the colour you need.

 Here is a closer look at the Little Baby Fairy, I think she's adorable, she was a pleasure to colour. 

I hope you're inspired to head on over to Make it Crafty and pick up some of Zoe's delightful images or her super fine chipboard pieces.

Copics used 
 Flower: RV00, 63, 66; YG61, 63, 67; Y000, 02. 06, 35 & 38
 Skin:  E0000, 000, 01; R 20
Hair:  E40, 43 Sand Spica, Clear Star Jelly Roll
Hat: E30, 31, 33 & 35
Blanket:  V0000 & 01
Nightshirt: B0000 & 0  
 Background:  B00


Cheers,
Kasey ~ in Oz

01 January 2013

Happy New Year!


Update:  This project was selected as a runner up at Eclectic Ellapu!  Thank you so much.

Hi everyone, I hope you managed to celebrate the arrival of 2013.  I spent a lovely time in my craft room just colouring images and popping them into my little A5 pocket folder along with the list of colours I used, ready for when I need a quick card made.

This little one however I decided to add to my smash book, I've been putting copic images in there to use when I want a colour combination inspiration.

 Here is a close up of Fairy Dahlia from Make it Crafty, she's super cute!  I tried a multi coloured dotty background and I think it really makes her pop on the page.


 I was also playing around with some dies, and cut out several La Rue Flourishes from Memory Box and then cut them up and made the corners and backing mat for the image.  I'm really happy with how it looks so delicate and of course I did add bling, actually the dies and the kraft page are spritzed with Champagne shimmer mist.  LOVE that stuff for shimmer.

Here is a pic of the two Pink Pages together.  These little beauties just look so adorable in pink!

I'm entering this smashbook page into the following challenges.

Eclectic Ellapu - Anything Goes
ABC Challenges - New Year Sparkle
Make it Monday - Anything Goes
Digi Makeover Challenge - Anything Goes

Thank you for visiting, I wish you all the best 2013 has to offer you.  Make it a fabulous year.

Cheers,
Kasey ~ in Oz


15 May 2012

It's a Girl Thing!

Hello there, I've been playing around with some of my new digi stamps from Make it Crafty and decided to try blue black hair.  Try being the operative word here!  first attempt, not so sure about.  I think I'll need to check out some tutorials on this one and practice a whole lot more.

Anyway here is Ashlyn in all her glory.  Love the ruffles and all that hair!  Fun to colour but these images do take a little bit of time. 

 Miss Ashlyn is being entered into the following challenges.

Wild Orchid Crafts ~ Anything Goes
Bunny Zoe's Crafts ~ Anything Goes
Make it Monday ~ Linky Party

Copics used here are...

Skin:  E50, E51 & E53
Hair: N5, N7, 100 B24
Top: R81, R83, R85 & 0

Marianne designs corner die, Wild Orchid Roses and buds  Unity sentiment, SU lable punch and ribbon from my stash.

Cheers,
Kasey ~ in Oz

13 May 2012

Sweet Purple Aleisha

I finally put an order in for some Make it Crafty digi's and I have to say, I love them, they are such a pleasure to colour, all that flowing hair!

Here is Aleisha, a study in purple, I've surrounded her with some gorgeous flowers, my order from Wild Orchid Crafts arrived, and I now have lots and lots of tiny roses, I think I'll need to order some slightly larger ones too.  The large purple rose totally gorgeous, I can't remember where I got that one from I've sprayed it with a mix of Pearl-ex powder in rubbing alcohol, I sprayed two smaller rosebud too.

  I've layered Aleisha on a Cheery Lynne doily die and then cut a fanciful flourish and a small butterfly in SU Concord Crush.


She's been coloured with Copic markers and this is my first attempt at doing the platinum blonde hair.  I've used E40 and E42 and 0 to do her hair along with some clear spica to add some shine.

Hope you like my Aleisha and the study in purples, my all time favourite colour!

Entering this into the challenge at Cheery Lynne Designs 
and it's my second entry at Make It Monday.

Cheers,

Kasey ~ in Oz